[Big News]Brorsoft's iPhone Data Recovery Entitled iRefone Released - 50% Discount Off

[Big News]Brorsoft's iPhone Data Recovery Entitled iRefone Released - 50% Discount Off
Get Brorsoft iRefone for Windows and Mac by joning Brorsoft Facebook Community activities. Click Like button, you can get 50% Off Promo Codes.

Thursday, September 26, 2013

Using Canon H.264 MOV files in Sony Vegas Pro smoothly

Summary: This article will show the best way to convert Canon H.264 MOV to MPEG-2, so that you can import Canon .MOV files into Sony Vegas Pro for smooth editing work.


Canon cameras- 5D mark III, 7D, 10D, 60D, T2i, T5i, etc are familiar with everyone whoever has passion for Canon EOS Digital DSLR. The point here, you will find it a painful experience to import and edit Canon H.264 MOV with Sony Vegas Pro software. There’re some frequently asked questions quoted as below.

Q 1: Importing .MOV files into Sony Vegas from Canon 600D

I'm planning to purchase a Canon 600D for YouTube videos, however I found out the only file format it records in is .MOV much like the iPhone recordings, previously I've had to convert these to .wmv to get them to work in Sony Vegas Pro, but it loses the video quality. Is there anything I can do to be able to import the the files into Vegas without any problems without an error message? Or is there a way of converting the file but keeping the majority of the quality?

Q 2: How to convert each separate MOV clip from 5D Mark II to Vegas Pro

Something is odd about these .MOV files from canon (my camera is 5D Mark II). The problem is documented on internet but I have not found any solution except to convert each separate clip and then I can use them with Vegas Pro editing software. How can I “batch” convert them?

As you know Canon EOS DSLR records MOV videos, but it seems Sony Vegas Pro (including the recent Vegas Pro 12) does not like the way. The file type is a compressed output format, but not ideal for editing in NLE system. To solve those problems, the quick workaround is to transcode MOV files to Vegas Pro natively supported formats (MPG/WMV are highly recommended). Along with some help from third-party software, it can be done effortlessly. Here I share a simple guide on how to convert Canon H.264 MOV files for Sony Vegas Pro editing smoothly. If you’re facing the issues, read on to find the answer.

ownloading the App- Brorsoft Video Converter

Overall, the program is the best Video Converter for Canon MOV footage. With this Canon MOV converter, you can effortlessly transcode Canon MOV files to MPEG-2 or WMV, which will create a Sony Vegas Pro friendly file format keeping the original quality. Besides Vegas, this software can also export DNxHD for Avid, MPEG-2 for Adobe Premiere Pro, Premiere Element, AVI for Pinnacle Studio, WMV to Windows Movie Maker and more NLE systems for native editing. Just download it and follow the tutorial below to get the work done.

Convert/Import Canon MOV clips to Vegas Pro

Step 1: Add Canon MOV video files

Install and launch the Canon MOV converter and load source MOV clips to it. You can batch convert multiple .mov clips as you want.


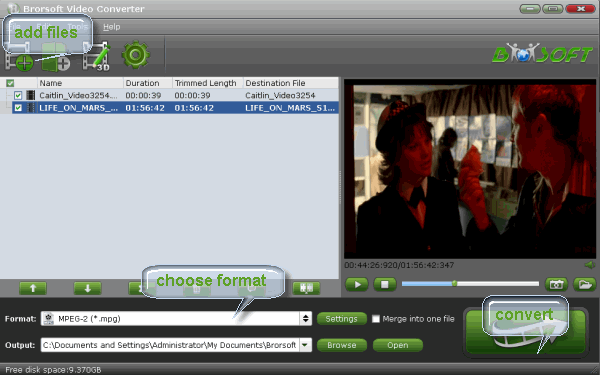
Step 2: Choose output format

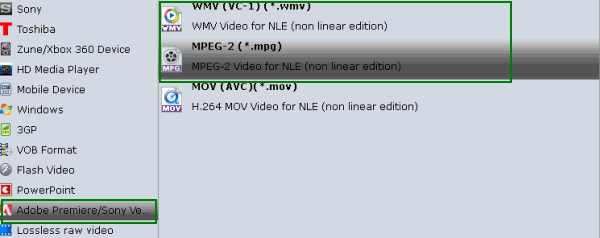
Click “Format” pull down list to select Adobe Premiere/Sony Vegas> MPEG-2(*.mpg) as the best video format for Sony Vegas Pro. WMV formats is the good choice as well.


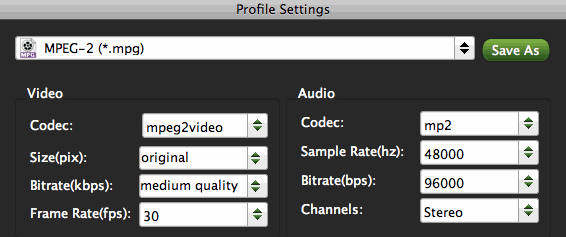
Tip - Profile Settings:
In case the default settings do not fit your requirement, you can click “Settings” button and enter “Profile Settings” panel to adjust video size, bit rate, frame rate, sample rate and audio channels.

Step 3: Start Canon MOV video conversion

Click “Convert” button to start encoding Canon H.264 MOV video to MPG/WMV for importing to Sony Vegas Pro 8/9/10/11/12. When the conversion task is finished, click “Open” button to get the exported files and then import the converted Canon MOV files into Vegas Pro to do further editing without any issue.

Related Guides and Tips:

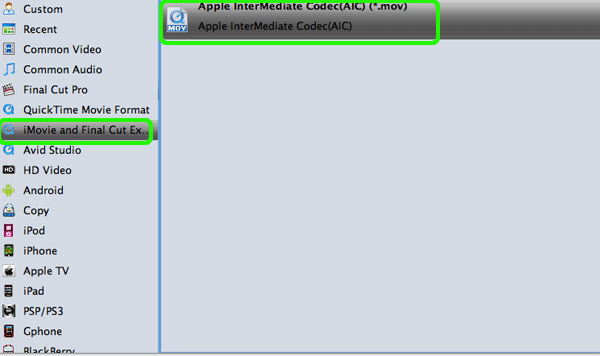
Transcode Canon T5i MOV for editing in iMovie/FCE
Transcode Canon EOS 6D H.264 MOV to AIC for iMovie
How to upload Canon Rebel T3i/T5i videos to Windows Movie Maker
Canon Legria HF G25 AVCHD compatibility with iMovie
Transcoding some Canon 5D Mark III footage to MPEG-2 for Vegas Pro
Trouble Importing on Canon 7D/60D/70D and Premiere Pro

Tuesday, September 10, 2013

Nikon D7100/D7000 MOV edit in Adobe Premiere Pro

Summary: The Adobe Premiere Pro won’t import H.264 .mov files from Nikon D7100, D700. The easy workaround is to transcode MOV to Premiere Pro natively supported format – MPEG2. Here is a quick-stare guide.


Nikon D7100, D700, two outstanding DSLR cameras, are very popular among professional photographers or the amateurs. It supports full HD 1080p 60i/30p H.264 MOV video recording. However, users find it’s difficult to import Nikon MOV clips to Adobe Premiere Pro or other NLE system.

As far as I know, Nikon footage is highly compressed with H.264 codec, which is unacceptable by various non-linear editing systems (NLE), like Avid Media Composer(5/5.5/6/6.5), Pinnacle Studio, Final Cut Pro (FCP 6/7/X), Sony Vegas, Adobe Premiere Pro(CS3/CS4/CS5/CS6), etc. In order to import the MOV files from Nikon camera to Premiere Pro for editing, the easy workaround is to transcode Nikon MOV files to Premiere Pro compatible video formats. Along with some help from a top H.264 MOV Converter, it can be done. To help those who wanna edit Nikon MOV files in Premiere Pro without problems, here I share with you a simple guide on how to convert MOV to edit in Adobe Premiere Pro.

First of all, downloading the App- Brorsoft Video Converter for Mac

Overall, the program is a professional yet easy-to-use MOV to Premiere Pro Converter on Mac(Mac OS X Mountain Lion included) which can not only convert Nikon D7100, D7000, D4, D5100, D3200, etc videos, but also provide simple video editing functions for you. This Mac Video Converter can transcode videos from HD cameras or camcorders (like Nikon, JVC, Panasonic, Sony and Cannon) for editing in Adobe Premiere Pro, Avid MC, Final Cut Pro, iMovie, etc. The equivalent Windows version is Brorsoft Video Converter, which can transcode video files for Windows editing smoothly. Just download it and follow the tutorial below to get Adobe Premiere Pro and MOV clips to work beautifully.

Converting MOV to MPEG-2 that Adobe Premiere Pro handles well:

Step 1. Launch the Nikon MOV Converter. Drag and drop .mov clips to file list. The converter works with MOV shootings taken with Nikon or Canon DSLR series.


Step 2. Set MPEG-2 as output format. Click on "Format", and select output format from the drop-down list. Follow "Adobe Premiere/Sony Vegas " > MPEG-2 (*.mpg)”.


Tip: Adjust video resolution, bit rate, frame rate, etc.

Click "Settings" button if you’d like to customize advanced audio and video parameters like Video Codec, aspect ratio, bit rate, frame rate, Audio codec, sample rate, audio channels.


Step 3.Click the convert button under the preview window; the MOV converter will start converting Nikon footage to Premiere Pro immediately. Soon after the conversion is finished, just click “Open” button to get the generated files for edit in Adobe Premiere Pro CS3/CS4/CS5/CS6 perfectly.

Related Tips:

Sony PMW-EX1/PMW-EX3 and Premiere Pro Workflow
How to Edit MP4 videos in Premiere Pro
Transcode Nikon D7100 MOV files to edit in FCP
How to import video from D4/D5100/D3200 to Premiere Pro
Best workflow for Nikon D4/D5100/D3200 MOV to Vegas Pro
How can I add WMV and VOB files to iTunes

Tuesday, September 3, 2013

How to Import Panasonic HDC-SD90 footage to Mac FCP, iMovie, FCE

In this guide, you can get to know the easy method to convert Panasonic HDC-SD90 recorded AVCHD videos to Mac for editing, playing or sharing.


Panasonic's HDC-SD90 High Definition Camcorder grabs photographers' and shutterbugs' attention with its 3D recording and the amazing capability to capture super-smooth 1080/60p or 1080/50p footage (Europe version). With its transfer rate of 28 Mbps, 1,080p recording (Full-HD, 1,920 x 1,080, 60 progressive recording) conveys about twice the information of 1,080i (interlace) recording. Due to the reason, the HDC-SD90 can yield stunningly detailed, vibrant, and life-like footage that will look great on your HDTV so that you can share your beautiful memories with your family members and friends. Only the two features will make it on the top of the customers’ list, not to mention its 28mm Wide Angle Lens, Intelligent 40x Zoom and HYBRID O.I.S., O.I.S. (Optical Image Stabilizer) Lock and Crystal Engine PRO, etc.

While enjoying the stunning HD image quality, many folks are having problems when using HDC-SD90 footage on Mac. And there are some frquently asked questions quoted as below:

"How can I upload my videos from Panasonic HDC-D-SD90 to mac iMovie? Will these MTS videos editable in iMovie?"

"I have just shot my first clip with this video camera and am trying to import it into FCP but FCP will not recognize SD90 camcorder even though the video camera shows up in system profiler?"

"I import from Panasonic HDC-SD90 in 1920-1080/50p to convert in MOV format on Mac for track motion to create 3D movies because the Panasonic HDC-SD90 camcorder has MTS file. "

Panasonic HDC-SD90 provides us great ways to record our most unforgettable moments. To edit, play or share Panasonic HDC-SD90 video on Mac, you will need to convert SD90 AVCHD MTS to bet compatible format for Mac OS. Only by converting can you avoid video playback, editing and importing problems due to the recorded AVCHD format. Here we recommend a decent Panasonic AVCHD file Converter on Mac platform - Brorsoft MTS Converter for Mac, to help you get it done.

The app is a professional Mac application for converting AVCHD files from Sony/Panasonic/Canon HD camcorders that produce .mts, .m2ts, or .m2t files. And it can help you transform the Panasonic AVCHD file for editing with non-linear editing systems like iMovie, FCE, Final Cut Pro, Avid MC, Premiere Pro etc. or playing back in quicktime on Mac. If you're editing, playing or sharing recorded AVCHD videos, chances are you already installed this great utility. If not, download it it from here.

The Steps: How to Transcode Panasonic SD90 MTS files on Mac OS X

Step 1. Copy your resource AVCHD recordings to Mac

Connect your Panasonic HDC-SD90 to Mac with a USB cable, and find the AVCHD file folder in hard drive of your camcorder. Then copy the video files to your Mac hard drive.

Step 2. Load AVCHD files to the program.

Launch Brorsoft MTS/M2TS Converter on Mac and then click "Add" button to import the MTS videos to the software.


Step 3. Click format column and choose the output format.

You can choose Final Cut Pro -> Apple ProRes 422 (*.mov), this codec is optimized for FCP editing;

You can also choose Avid Media Composer -> Avid DNxHD (*.mov), it's for Avid editing;

For playback, you can choose HD Video -> QuickTime MOV;

For sharing on website like YouTube, you can choose MP4 format for output.


Tip: You can edit the Sony HandyCam videos in this program before converting to other formats on Mac OS. Trim, crop, add watermark or adjust effect as you want.

Step 4. After everything is OK, press Convert button to start converting Panasonic HDC-SD90AVCHD videos on Mac.

This best Mac HandyCam Video Converter will convert recorded AVCHD footages on Mac at top speed, you can choose rich formats for output on Mac, and then you can use handycam recorded MTS footages to playback, editing or sharing. If you need to edit or play Pansonic HDC-SD90 AVCHD on Windows platform, you can try MTS Converter for Windows. Please take a try now, it will do a great favor for you.

Related Guides:
Converting Sony 60P MTS files to edit in iMovie
How to ingest Sony 50p/60p AVCHD footage to Premiere Pro
Fluid workflow for editing 60p footage in Vegas Pro
How to transfer Lumix Video from Panasonic ZS30/TZ40 to Mac
Solution to Premiere Pro's problem with Canon XF100 MXF files
How to use Sony NEX-5 videos on Mac
Panasonic DMC-G6 60p Workflow in Final Cut Pro