[Big News]Brorsoft's iPhone Data Recovery Entitled iRefone Released - 50% Discount Off

[Big News]Brorsoft's iPhone Data Recovery Entitled iRefone Released - 50% Discount Off
Get Brorsoft iRefone for Windows and Mac by joning Brorsoft Facebook Community activities. Click Like button, you can get 50% Off Promo Codes.

Monday, June 23, 2014

How to import Sony FDR-AX100 4K Recordings(xavc s files) to Sony Vegas Pro


Source:Encoding Sony AX100 XAVC S files to MPEG-2 for Sony Vegas Pro

If you have Sony AX100 XAVC S import issue in Sony Vegas Pro, this post will help you to make Vegas Pro work with Sony AX100 4k recordings by transcoding them to Vegas friendly format.

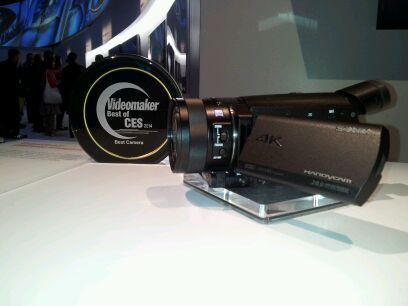
The FDR-AX100 might be an ideal casual, travel camera. One interesting possibility to consider is the option of shooting photos and video at the same time. When shooting in the 4K recording mode each frame of video is the equivalent of an 8.3MP photograph. That’s more resolution than the sensors in most cell phone cameras.

*Capture 4K/30p video that far exceeds HD resolution
*1″ Exmor R CMOS sensor with direct pixel readout
*14MP video and 20MP still image capture
*XAVC-S, AVCHD and MP4 codecs
*Carl Zeiss Vario-Sonnar T* lens with 12x optical zoom
*BIONZ? X Processor for 120 fps recording
*Optical SteadyShot Image Stabilization with Active Mode
*High contrast 0.39″ OLED EVF
*3.5″ XtraFineLCD (921K) display
*Smartphone connectivity via Wi-Fi/NFC

The FDR-AX100 utilize Sony’s XAVC S recording format, which supports resolutions of up to 3840 x 2160 4K Ultra HD at 24p and 30p frames per second. XAVC S codec is a new one, and is not widely supported. If we want to import and edit the 4K XAVC-S files from FDR-AX100 into Sony Vegas Pro, the reslut may let you down- Vegas Pro won't open Sony AX100 4K footage correctly.


So, what's the solution ?

To get rid of the issues, one possible solution is to transcode Sony FDR-AX100 XAVC-S to a more "edit" friendly codec for Vegas Pro. Now I share the guide with you how to convert XAVC S footage to Sony Vegas Pro friendly format using Brorsoft Video Converter- a best XAVC S Converter on Windows(Windows 8).

It does a good job in converting Sony FDR-AX100 XAVC-S files to Sony Vegas Pro most compatible format like MPEG-2 with least quality loss. Plus, it supports encoding camera shootings in different formats (H.264 MOV, MTS/M2TS, MP4, MXF, etc.) to video editing software compatible file types, i.e. MPEG-2 for Premiere Pro, DNxHD for Avid Media Composer, WMV for Windows Movie Maker, AVI to Pinnacle Studio to meet your different needs.

Also, you can get the Mac XAVC S Converter for Mac Version.

Encoding Sony AX100 XAVC S files to MPEG-2 for Sony Vegas Pro

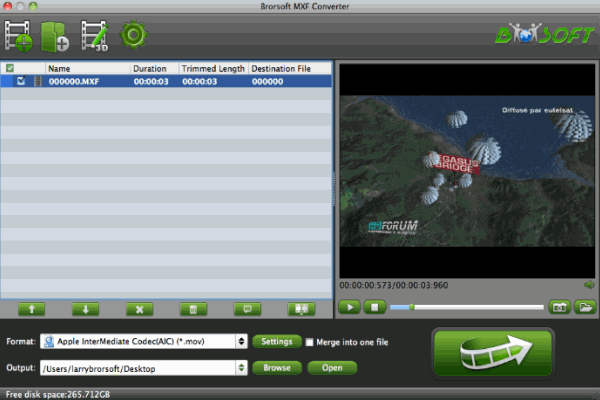
Step 1: Run the best XAVC S to Vegas Pro Converter, and click the "Add" button to load .xvac s videos from Sony FDR-AX100.


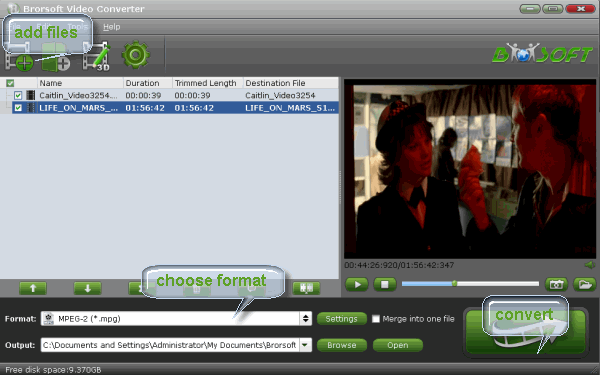
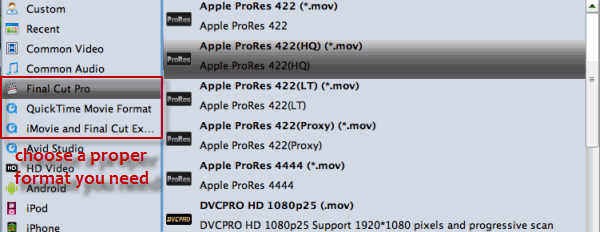
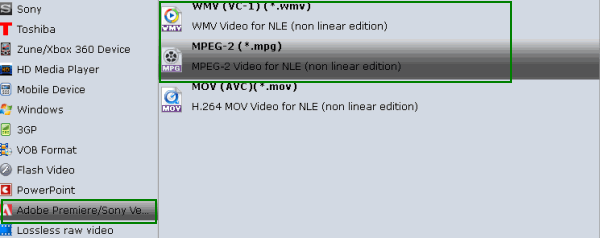
Step 2: Click "Format" bar to determine output format. Follow "Adobe Premiere/Sony Vegas" and select “MPEG-2(*.mpg)” as the output format. Besides, you can also choose WMV (VC-1) (*.wmv) if you want to get a relatively smaller output file.


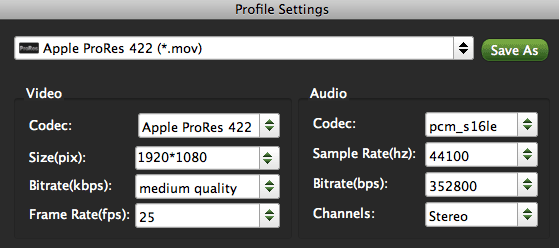
Step 3: Adjust video and audio parameters, including the Bitrate of Video and Audio, the Codec of Video and Audio, Video Size, Sample Rate, Frame Rate, Audio Channels, etc., in the Profile Settings.

Step 4: Click “Convert” button to start encoding Sony AX100 XAVC S to MPG for importing to Sony Vegas Pro.

When the conversion task is finished, click “Open” button to get the exported files and then import the converted Sony FDR-AX100 footage into Vegas Pro to do further editing without hassle.

More Guides:

What if After Effects won't play AVI video
Canon XF200 Workflow with Final Cut Pro X
How let Windows Movie Maker support DivX videos
Howto Import Sony FDR-AX1 footage to Final Cut Pro
How to upload Sony F55/F5 video footage to Vegas Pro
How to edit Sony AX100 4K XAVC S footage in iMovie

Sunday, June 22, 2014

DVD to Surface Pro 3-Watch DVD movies on Microsoft Surface Pro 3

Those of you who happen to own the Surface Pro 3, here is a simple guide on Playing DVD movies on Surface Pro 3 via converting DVD to MP4 format for Microsoft Surface Pro.
The Microsoft Surface Pro 3 is an amazing and unique computer, there’s no question about it, and if you know its strengths, it will serve you very well. Like any extreme computers, you can’t just get one and expect it to feel like an ordinary laptop.

Have you made plans for the incoming Summer vacation yet? How about enjoy some DVD movies on your Surface Pro 3? While what you need to do first is to convert DVD to Surface Pro 3 supported video format and then transfer the result videos to the Windows 8.1 Pro tablet.

To rip DVDs for playing on Surface Pro 3, a professional DVD to Surface Pro 3 converter is the key. Here I recommend you try Brorsoft DVD Ripper. It is easy to use for editing and conversion and makes great quality copies of my DVDs. To be honest, this DVD ripping software can help you rip and convert all the DVD Discs even DVD ISO image files. The audio/video synchronization is very good, the size of the subtitles too. The equivalent Mac version is Brorsoft DVD Ripper for Mac, which can rip and convert DVD movies to Microsoft Surface Pro 3 on Mac OS X (Mavericks). Just get it now and follow the steps below to copy DVD movies to Surface Pro 3 for smoothly playing!

How to Rip DVD movies to Surface Pro 3 compatible video formats

The below guide uses DVD Ripper Windows screenshots. The way ripping DVD movies to Surface Pro 3 on Mac is almost the same. Just make sure you get the right version.

Step 1: Add DVD movies

Start the DVD to Surface Pro 3 converter and click DVD disc icon to load source DVD movies. If you have backup the entire DVD disc on hard drive, you can also click DVD Folder button to load the movie folder.


Step 2: Choose output format

Click "Format" bar, you can get optimized videos for your surface under "Windows > Microsoft Surface Windows RT/Pro H.264 Video (*.mp4)". The output videos could fit on Surface Pro 3 perfectly. If you like, you can click "Settings" to change the video encoder, resolution, frame rate, etc. as you wish.


Tip: Before start the conversion, you can also select your preferred subtitles for your movie from the Subtitles option.

Step 3: Start the DVD to Surface Pro 3 conversion

When you are satisfied with all the settings, you can click "Convert" and let the software do the DVD to Surface Pro 3 MP4 conversion.

After the ripping, you can click "Open" to locate the converted MP4 video files and just transfer them to your Surface Pro 3. You can play DVD on Microsoft Surface Pro 3 without limitation.

Additional Tips:

If you are considering to get a powerful all-in-one tool to convert videos, Blu-ray movies and DVDs to your Surface Pro/RT, Surface 2, Surface Pro 3 or Galaxy Tab 3 8.0, Galaxy Tab 2 10.1, Samsung Galaxy S IV, Samsung Galaxy S3, Nook HD, Kindle Fire HD, Nexus 7 or other devices at the same saving time and effort, Blu-ray Video Converter Ultimate will be a nice choice for you. If you are running a Mac, iMedia Converter Mac is the alternative.

Related Guides:

How to Rip Blu-ray movies for Surface tablet
What video formats can Microsoft Surface RT play
Rip and Copy Blu-ray/DVD movies to Surface 2
A simple solution to converting AVI to MPEG
An easy way to convert a DVD ISO to DivX video
Get the Best Mavericks DVD Ripper to Rip DVD on Mac

Sunday, June 15, 2014

Panasonic GH4 4k video import to Mac-How to Convert DMC-GH4 AVCHD for editing in FCP/FCE/iMovie

This tutorial will show you how to easily convert AVCHD footages from Panasonic DMC-GH4 4K camera to MOV or MP4 foramt so that you can import the video files to Final Cut Pro, iMovie and more for editing.
The Panasonic Lumix GH4 is the latest, top of the range Micro Four Thirds camera from Panasonic, and features 4K video recording as well as shooting stills at 12fps, faster than any other Micro Four Thirds camera.
Key Features

*16.05 megapixel Live MOS sensor
*3inch 1036k dot vari-angle touch-screen
*2360k dot electronic viewfinder (EVF)
*12fps continuous shooting (AFS), 7.5fps continuous shooting (AFC)
*-4 EV to 18 EV focus detection range
*200,000 shot shutter life rating
*Quad-core Venus Engine image processor
*4K/2K video recording, with stereo sound
*Weather sealed splash/dust proof body
*Wi-Fi / NFC connectivity
*ISO100 (Extended) to ISO25600
*500 shot battery life, 220 minutes video recording
*Microphone / Headphone sockets (3.5mm)

According to my testing, the 4K video was restricted to shooting and editing in Final Cut Pro X, which handles 4K input and renders the output to 1080 HD. If you want to import Panasonic GH4 4k to iMovie/FCE/FCP(6/7), you will need to do some preparation before editing.

The reason that you can't successfully ingest those Panasonic GH4 recorded 4K files to FCP, iMovie, FCE, etc non-linear editing systems is simple. Currently 4K footage is not widely supported yet, only a few video editing program like FCP X can support it. In order to edit Panasonic DMC-GH4 4K MOV/MP4 files smoothly, the easy workaround is to use 3rd-party to rewrap and convert Panasonic GH4 footage to a more "editable" format in 1080p.

Converting Panasonic DMC-GH4 4K footage to FCP, iMovie, FCE compatible video

1. Download Brorsoft Video Converter for Mac

Overall, this program is a completely professional Mac 4K video converter, player and editor. Unlike some free video converters, it provides hundreds of output format presets for 4K videos, such as Apple ProRes 422, Apple ProRes 4444 for Final Cut Pro, AIC MOV for FCE (Final Cut Express) and iMovie, for better editing and playing. This Ultra HD Video Converter is also available to customize the output resolutions to any size the users want. Thus, with the video converter app, you can fast transcode Panasonic GH4 4K video to FCP, iMovie, FCE friendly format with ease.

2. Launch the 4K file converter and click add button to import Panasonic 4k clips to the program for converting.


3. Click "format" bar to choose the output format. You can freely choose Final Cut Pro > Apple ProRes 422 (*.mov) for FCP, or iMovie and Final Cut Express > Apple InterMediate Codec (AIC) (*.mov) for working with iMovie/FCE.


Tip: Click the Settings button; you can recommended to set the video size, bit rate, fame rate, etc. Here you are recommended to set the video size as 1920*1080 for iMovie, FCE, Final Cut Pro 6/7 can’t support raw 4K video well.

4. Hit the Convert button to start the conversion; it will convert Panasonic GH4 4K MOV/MP4 to iMovie/FCE/FCP friendly format on Mac OS X.

After the conversion, you can transfer the converted Panasonic GH4 videos to Mac for further editing with FCP, FCE, iMovie smoothly.

Additional Tips:

1. If you record MTS files with Panasonic GH4 and met troubles in editing Panasonic GH4 MTS in iMovie, FCE, FCP, this Panasonic 4K Converter can be also used to transcode Panasonic GH4 MTS to ProRes for FCP, AIC for iMovie and FCE, which ensures a smooth workflow.

2. Brorsoft Video Converter for Mac not only can converting Panasonic footage, but also can transcode Sony MTS, Nikon/Canon MOV recordings to FCP/iMovie/FCE editable format without losing quality.

See more:

Transfer AVI to MP4 for iPad Air
Conver Divx video to FCP MOV, MP4, DV on Mac
Converting from VOB to MPEG file in a simple way
How to digitize Disney Blu-rays to Mac Hard drvie
Fast convert DVR-MS to edit in Windows Movie Maker
How to Import Sony FDR-AX100 footage to Avid, FCP and Premiere

Tuesday, June 3, 2014

Editing Panasonic HPX2000 Footage with Mac -Transfer MXF file from Panasonic AJ-HPX2000 to Premiere Pro

High Definition (HD) is part of the same evolution. Once you get used to it its hard to go back. This article will show you how to import your HD camera Panasonic AJ-HPX2000 mxf footage to Adobe Premiere for editing.
My new camera is a fully decked out Panasonic HPX2000 for which I investigated long and hard. For me to get behind a Panasonic camera took a major leap of faith. I have always been a Sony devotee. After careful comparison and consultation we pulled the trigger on the Panasonic and I hope the decision will be as long lasting as the decision twenty years ago to go with Betacam. The reason was pretty simple. Better looking video, which looks like film.

Recording to P2 cards results in MXF files generated by the camera, but MXF, a highly compressed format, is not easy for editing in NLE system including iMovie, Final Cut Express, Final Cut Pro, Avid Media Composer, Adobe Premiere Pro, etc. Then how to import Panasonic HPX2000 videos to Adobe Premiere Pro without any issues?


In order to edit your Panasonic P2 MXF footage from AJ-HPX2000 in Adobe Premiere Pro smoothly, you should transcode MXF format to MPEG-2 format, as it is the best codec for Premiere Pro editing. Brorsoft MXF Converter for Mac is best choice to get the work done.

It lets you convert MXF to AIC, encode MXF to Apple ProRes, transcode MXF to MPEG-2, render MXF to DNxHD, and more. This is a smart tool specially designed for MXF users to preview and convert MXF recordings to your wanted video and audio formats, so as to smoothly add them into Adobe Premiere Pro, iMovie, FCE, FCP, Avid Media Composer and more other video editing software to do further editing. It naturally support converting MXF recordings shot by a Panasonic P2 camcorders and Canon XF camcorders on Mac OS X. If you are going to convert P2 MXF to Premiere Pro on Windows, please get MXF Converter. Just take a look at the brief guide below.

How to convert AJ-HPX2000 P2 .MXF to Premiere Pro

Step 1: Load P2 MXF footage

Free download the P2 MXF Converter Mac and then add your P2 MXF files into the program.


Step 2: Choose output format

Click “Format” pull down list to select Adobe Premiere/Sony Vegas> MPEG-2(*.mpg) as the best video format for Premiere Pro. WMV, MOV formats are the good choice as well.


Tip - Profile Settings:
In case the default settings do not fit your requirement, you can click “Settings” button and enter “Profile Settings” panel to adjust video size, bit rate, frame rate, sample rate and audio channels.

Step 3: Start P2 MXF video conversion

Click “Convert” button to start encoding Panasonic AJ-HPX2000 P2 MXF video to MPG/MOV/WMV for Premiere Pro CS4/CS5/CS6/CC7. When the conversion task is finished, click “Open” button to get the exported files and then import the converted P2 MXF files into Adobe Premiere Pro to do further editing.

Related Guides:

Transcoding P2 MXF files for Mac editing smoothly
How to Rip and Convert DVD to Kurio 7S
Tips Using DivX files with Final Cut Pro
Tips Put and play a YouTube video in PowePoint
Embed and Play DVD in PowerPoint smoothly
How To Rip DVD videos to Use Over DLNA

Monday, June 2, 2014

DivX to FCP ProRes Format- Convert DivX to ProRes for editing in Final Cut Pro

Summary: Failed to import DivX encoded files to Final Cut Pro for smooth editing? Fortunately, there is an easy way to fix the issue. Let's find it out here.


I've got an .avi files in DIVX format. What do I need to edit this DivX video in Final Cut Pro directly? Whenever I've tried to do this kind of thing before (using Flip4Mac as I remember) I've run into issues, for example FCP requiring me to render sound for the clips I drop into the timeline. I've already tried Flip4Mac, Perian and the regular DIVX codec and although some will allow me to play the movies with sound in QuickTime Player, none of them so far will allow Final Cut Pro to recognize the DivX files. The only workable way would be to convert DivX to ProRes, which is the best codec with best results when working with Final Cut Pro.

The quick and effective way I’ve worked out is to use the easy-to-use yet professional app Brorosft Video Converter for Mac which can be used as a DivX to Final Cut Pro Converter under OS X Leopard (10.5), Snow Leopard (10.6), Lion (10.7), Mountain Lion (10.8), Mavericks (10.9). With it, you can effortlessly transcode 720p/1080p DivX files to Apple ProRes video for FCP 6/7 and Final Cut Pro X, and it works well and converts flawlessly. Meanwhile, the Mac Video Conversion tool can create files compatible with various non-linear editing systems like Avid Media Composer, FCE, iMovie, Adobe Premiere Pro and Adobe Premiere Elements, etc.

How to convert and import DivX into Final Cut Pro on Mac?

1: Load DivX files to the program

You can directly drag and drop the DivX videos to the software, or click "Add" or "Add From Folder" to locate the DivX files into the DivX file converter.


Tip: Check the "Merge into one" box, you can join several DivX encoded clips together.

2: Choose output profile

Click "format" bar and choose "Final Cut Pro -> Apple ProRes 422 (*.mov)" as Final Cut Pro X compatible codec for editing DivX AVI in FCP smoothly. ProRes 422(HQ), Pro Res 422(LT), Pro Res 444, Pro Res 422(Proxy) are all the proper choice.


Tips: You can click “settings” button in the main interface to customize the output video’s parameters, such as resolution, frame rate, etc.


3: Start DivX to FCP conversion

Click the big "Convert" button at the bottom right corner, this DivX to ProRes Converter will start the conversion instantly! Once the conversion completes, you are free to use DivX movies in Final Cut Pro X/7/6!

Additional Tips:
1. Before the conversion, you can edit the DivX videos. By clicking “Edit” button, you can trim, crop the video, or add watermark and adjust effect to the videos which you will convert.

2. If you want to edit DivX in iMovie/FCE, you just need to choose the “iMovie and Final Cut Express -> Apple InterMediate Codec (AIC) (*.mov)” in the second step. For converting DivX to Adobe Premiere Pro, you need to choose " Adobe Premiere/Sony Vegas> MPEG-2(*.mpg) as the best video format.

Related posts:

Convert .VOB files to Work in Final Cut Pro X
Embed and Play DVD in PowerPoint smoothly
How To Rip DVD videos to Use Over DLNA
Get The Kurio 7S kids tablet DVD Playback Tips
DivX to iMovie- Import and Edit DivX files in iMovie
Importing and Using MTS files from Panasonic GM1 in iMovie