[Big News]Brorsoft's iPhone Data Recovery Entitled iRefone Released - 50% Discount Off

[Big News]Brorsoft's iPhone Data Recovery Entitled iRefone Released - 50% Discount Off
Get Brorsoft iRefone for Windows and Mac by joning Brorsoft Facebook Community activities. Click Like button, you can get 50% Off Promo Codes.

Friday, August 29, 2014

Best workflow for Panasonic LX5 AVCHD Lite to FCP/iMovie/FCE

Summary: Want to open and edit Panasonic DMC-LX5 AVCHD Lite footage in iMovie, FCP, FCE while facing import problems. Fortunately, there is an easy way to fix the issue. Let's find it out here.


The LX5 is the fourth camera to carry the LX name that supports AVCHD Lite recording format. This article is mainly to solve the Panasonic DMC-LX5 footage to iMovie, FCE, FCP importing problems. As many users get Panasonic LX5 camera, more problems are coming up: some of them have the need to import Panasonic LX5 AVCHD Lite to FCP/iMovie/FCE for editing on Mac OS X, but they always meet the importing issues.

Although Final Cut Pro, iMovie and FCE support most commonly-used video codecs including AVCHD Lite format, not all AVCHD (Lite) camcorders are compatible with these Mac NLEs. It’s mainly due to wide range of media types, and the different ways manufacturers store video. To import AVCHD Lite from LX5 to FCP, iMovie or FCE for editing smoothly, the easy workaround is to use 3rd-party to rewrap and convert AVCHD Lite to a more "editable" format on Mac.

Here you can download and install Brorsoft MTS/M2TS Converter for Mac, a powerful high-quality AVCHD (Lite) video converter, player and editor. If you're facing problems when working AVCHD Lite footage in Final Cut Pro X or FCP 7/6, iMovie 8/911, Final Cut Express on Mac, chances are you already installed this great free utility. If not, download it from below.

(Note: Click here for OS X 10.5)

The program is an easy-to-use yet professional app which can help you transcode Panasonic Lumix DMC-LX5 AVCHD Lite to ProRes, Apple InterMediate Codec to ensure maximum editing quality and efficiency when working with Final Cut Pro, iMoive and FCE under Mac OS X 10.9 Mavericks, 10.8 Mountain Lion, 10.7 Lion, Snow Leopard 10.6, Leopard 10.5.

Transcoding Panasonic LX5 AVCHD Lite for editing in iMovie, FCE, FCP

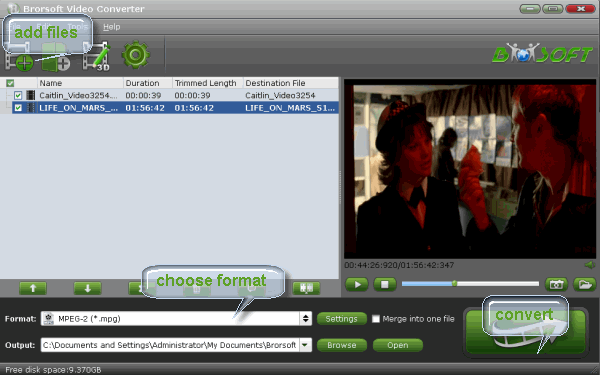
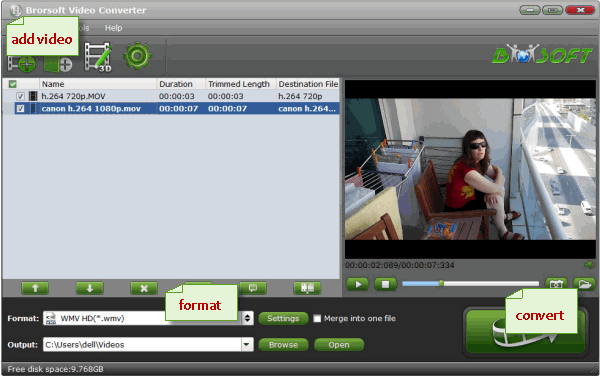
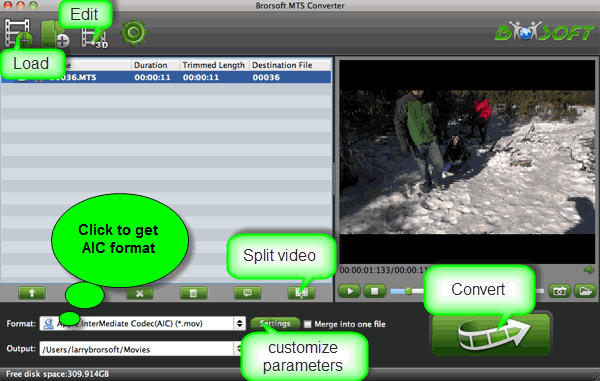
Step 1. Run the nice AVCHD Lite Converter on your Mac and load mpg clips to it by clicking “Add” button. The software supports batch conversion, so you can import several videos to it one time.


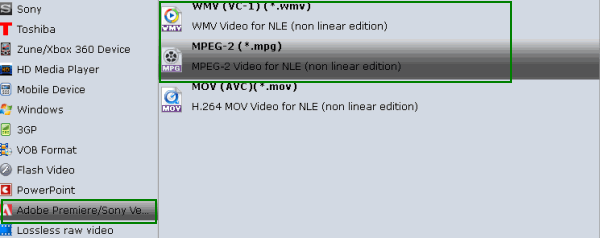
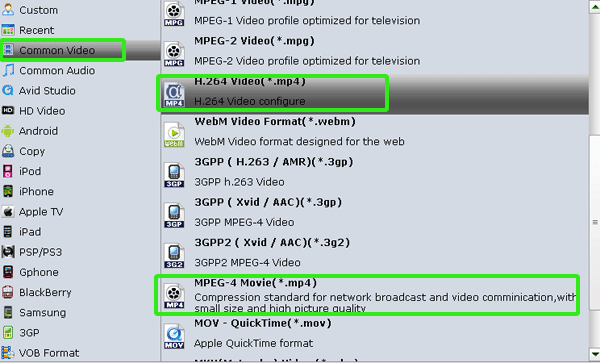
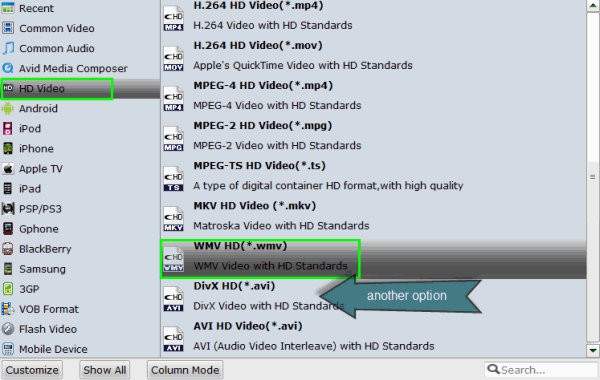
Step 2. Click "Format" bar and then move your pointer to "Final Cut Pro > Apple ProRes 422 (*.mov)", which is the best format for FCP;


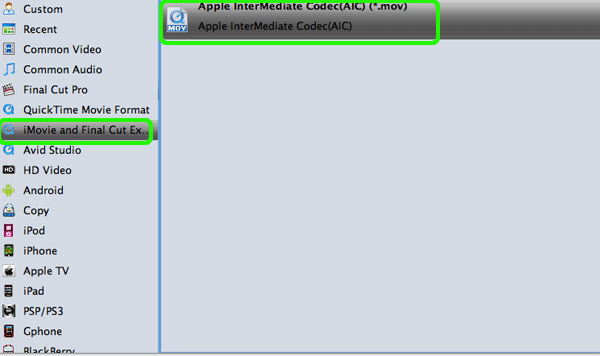
Select “iMovie > Apple InterMediate Codec(AIC) (*.mov)” as output format for editing Panasonic LX5 AVCHD Lite in iMovie or Final Cut Express.


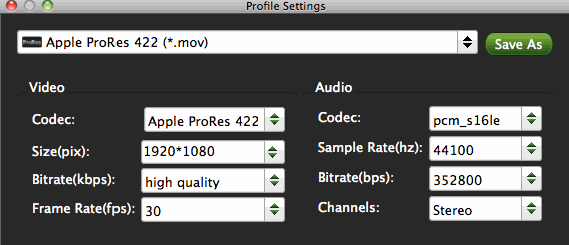
Step 3. You can click “Settings” to set video frame rate, video size and Video Bitrate as you want.

Step 4. Press "Convert" button to start Panasonic AVCHD Lite conversion on Mac OS X.

Once the conversion is 100% completed, you can smoothly copy the converted files to FCP/iMovie/FCE.

More Guides:

How to play Blu-ray movies in iTunes
How to Rip Blu-ray for Playback with Xbox 360
How to Import GoPro videos (h.264 mp4) to After Effects
H.264 to iMovie- Tips working with H.264 MP4 in iMovie
How to import Canon LEGRIA HF G30 MTS to FCP/iMovie
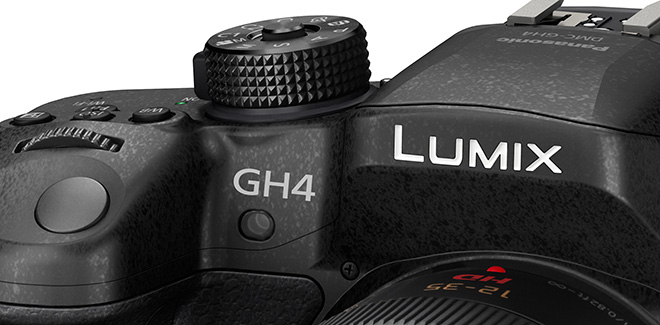
Converting 4K videos from Panasonic GH4 to work in Sony Vegas Pro

Monday, August 25, 2014

Best Workflow for Working Pansonic GH4 4K in Sony Vegas Pro 12/13

Summary: Follow the guide below and you will know how to import Panasonic LUMIX GH4 4K footage to Sony Vegas Pro without rendering or any other problems.


The Panasonic LUMIX DMC-GH4 is the world's first DSLM with 4K cinematic recording capability. Although the Panasonic GH4 offers us a wide choice for video recording format, it seems that the post-production is not as easy as we image. If you want to edit the 4K videos Panasonic GH4 record, you may find the high quality video files(no matter in MP4 or MOV format) are not recognized by most editing software including Sony Vegas Pro. So, how to convert/import Panasonic GH4 4K raw footage to Vegas Pro? Is there software can do the job?

The answer is positive. To get Sony Vegas Pro to work with Panasonic GH4 4K clips smoothly, you just need Brorsoft Video Converter to help you. It is the solid tool to help users to transcode 4K video files like 4K XAVC, XAVC S, MP4, MOV, etc to any format you want. It offers the optimal preset profiles for Sony Vegas Pro, Avid Media Composer, Adobe Premiere Pro, Pinnacle Studio and more. And there is no need to worry about the quality loss. Just download it and follow a simple tutorial below to import Panasonic GH4 footage into Sony Vegas Pro for editing smoothly.

Encoding Panasonic GH4 4K MOV/MP4 files to MPEG-2 for Sony Vegas Pro

Step 1: Add source video files

Install and launch the 4K video converter and load source MP4 or MOV clips to it.


Step 2: Choose output format

Click “Format" pull down list to select Adobe Premiere/Sony Vegas> MPEG-2(*.mpg) as the best video format for Sony Vegas Pro. WMV, MOV formats are the good choice as well.


Tip - Profile Settings:
In case the default settings do not fit your requirement, you can click “Settings" button and enter “Profile Settings" panel to adjust video size, bit rate, frame rate, sample rate and audio channels.

Step 3: Start Panasonic GH4 4K video conversion

Click “Convert" button to start converting Panasonic GH4 4K MOV/MP4 to MPEG-2 for importing to Vegas Pro 11/12/13. When the conversion task is finished, click “Open" button to get the exported files and then import the converted 4K files into Sony Vegas Pro to do further editing.

Additional Tips:
If you want to smoothly edit Panasonic GH4 4K footage in Adobe Premiere Pro, you just need to choose Adobe Premiere/Sony Vegas> MPEG-2(*.mpg) as output; For Avid Media Composer, choose "Avid Media Composer > Avid DNxHD(*.mov)" as output; For Windows Movie Maker, choose HD Video -->WMV HD(*.wmv) as output.

More Guides:

Rip Blu-ray for Playback with Roku 3
How to Rip your Blu-ray collection for Roku 3
Extract DVD Chapters from DVD Movies on Mac
Import and Edit 4K video with Adobe Premiere Pro
Importing Nikon D810 MOV in Sony Vegas Pro 12/13
Take 4K MP4 off Panasonic FZ1000 to Adobe After Effects

Sunday, August 17, 2014

How to Convert DVD movies to MP4 for playing on EVGA Tegra Note 7

Summary: Wanna enjoy DVD movies on EVGA Tegra Note 7 on travelling to kill the time? This article will tell you how to transfer DVD movies to EVGA Tegra Note 7 smoothly.

If you're looking for a cheaper alternative to the Samsung Galaxy Note 8, the EVGA Tegra Note 7 is your best bet which is the perfect traveling companion with a brilliant 7-inch HD display in a sleek. In addition, it features a 72-core NVIDIA GeForce GPU that users can watch HD video for up to ten hours. There is no doubt that it is a super App to kill the time while you are on travelling. However, there is a piece of horrible news for DVD lovers that they can not enjoy DVD movies on EVGA Tegra Note 7 in that it can not afford DVD movies directly.

It is a common sense that most tablets can’t support DVD discs directly since they even do not have DVD drive equipped. Then how can we solve the problem? Here is a simple way for you: get a third party program to rip DVD movies to MP4 (the most compatible video format for EVGA Tegra Note 7).

Here we recommend a best app to you - Brorsoft DVD Ripper which can help users deal with DVDs to EVGA Tegra Note 7 with fast speed and lossess quality. Besides, this App offers many output profiles for portable devices, like Samsung, iPad, Kindle, Nexus .etc. If you are a Mac user, DVD Ripper Mac is designed for you if you also want to decrypt DVDs into MP4 for portable devices. Now, download the correct version you need and follow the below guide to learn How to Convert DVD movies to MP4 for EVGA Tegra Note 7.

How to Convert DVD movies to MP4 for EVGA Tegra Note 7

Step 1: Load DVD movie

Insert your DVD disc to DVD drive and run App you just downloaded, click "Load Disc" button to add DVD movies.


Step 2: Select EVGA Tegra Note 7 compatible format

MP4 is the most compatible video format for EVGA Tegra Note 7. So, here we suggest you to select "Common Video > H.264(*.mp4)" as the export format.


Tips: If you are not satisfied with the defaulted settings, you can click the "Settings" button to change the parameters by yourself including video resolution, bit rate, audio sample rate, audio channel etc. for full screen playback smoothly.

Step 3: Convert DVD to EVGA Tegra Note 7

Finally, click the "Convert" button to start DVD to EVGA Tegra Note 7 conversion.

When it finishes, click the "Open" icon on the main interface to locate the ripped movie and transfer it to your EVGA Tegra Note 7, and then you can play DVD movies on EVGA Tegra Note 7 as you want!

See also:
What is a good Alternative for CloneDVD?
How to Convert Blu-ray to DivX files with Subtitles
Best DVD Shrink Alternative for Mavericks to Copy DVD
How to Convert DVD to Galaxy Tab Pro 8.4 readable format
Watch DVD movies(DVD/DVD ISO) on Sony Xperia Z2 with subtitles
Copy Blu-ray and DVD from PC/Mac to Samsung Galaxy Tab S 8.4/10.5

Sunday, August 10, 2014

Converting Nikon D5100/D5200 MOV for Windows Movie Maker Editing Smoothly

Summary: In this guide, you can know the easy method to import Nikon MOV files from D5100, D5200 to Windows Movie Maker for editing, playing flawlessly.


Two outstanding DSLR cameras from Nikon: D5100, D5200 are very popular among professional photographers or the amateurs. It supports full HD H.264 MOV video recording. However, users find it’s difficult to import Nikon MOV clips to Windows Movie Maker or other NLE system. Here I share with you a simple guide on how to get Nikon D5100/5200 video to Windows Movie Maker in full compatibitlity without any playback or editing issues.

As you know, Nikon footage is highly compressed with H.264 codec, which is unacceptable by various non-linear editing systems (NLE), including Windows Movie Maker as well as Avid Media Composer(5/5.5/6/6.5/7), Pinnacle Studio, Sony Vegas, Adobe Premiere Pro(CS3/CS4/CS5/CS6CC)... In order to import the MOV files from Nikon D5100/D5200 to Movie Maker for editing, the easy workaround is to transcode Nikon MOV videos to Windows Movie Maker compatible video formats. Along with some help from a top H.264 MOV Converter, it can be done.

First of all, downloading the App- Brorsoft Video Converter

Overall, the program is a professional yet easy-to-use Nikon MOV Converter. It not only can convert Nikon D5100, D5200 MOV to Windows Movie Maker editable format(.wmv) with the best output quality, but also provide simple video editing functions for you. What’s more, this video converter can transcode videos from HD cameras or camcorders (like Nikon, JVC, Panasonic, Sony and Cannon) for editing in Windows Movie Maker, Adobe Premiere Pro, Avid Media Composer, Sony Vegas Pro, etc. Just download it and follow the tutorial below to get Windows Movie Maker and Nikon MOV clips to work beautifully.

Converting Nikon MOV to Windows Movie Maker:

Step 1. Launch the Nikon MOV Converter. Drag and drop .mov clips to file list. The converter works with all MOV shootings taken with Nikon or Canon DSLR series.


Step 2. Hit the Format box and select HD Video -->WMV HD(*.wmv) on the dropdown menu as output format. Besides, you can also choose Divx HD(*.avi) as output if you have not installed the .wmv codec.


Tip: Adjust video resolution, bit rate, frame rate, etc.

Click "Settings" button if you’d like to customize advanced audio and video parameters like Video Codec, aspect ratio, bit rate, frame rate, Audio codec, sample rate, audio channels.

Step 3. Click the convert button under the preview window; the MOV converter will start converting Nikon footage to Windows Movie Maker immediately. Soon after the conversion is finished, just click “Open” button to get the generated files for edit in Windows Movie Maker perfectly.

See more:

Tricks for Editing MP4 files in After Effects
A guide to digitize Blu-ray movie collection
Get Program for converting AVI to FCE format
Edit Sony F5/F55 XAVC files in Final Cut Pro 7/X
How to Convert XAVC to ProRes for Final Cut Pro
Import Sony PMW-F5/F55 XAVC footage into Final Cut Pro (X)

Friday, August 8, 2014

Rewrap 4K XAVC to ProRes 422, 4444 for editing in Final Cut Pro on Mac Mavericks

Summary: If you want to import (4K) XAVC files to Final Cut Pro X or FCP 7/6 for smooth editing, first thing you need to do is to convert XAVC to ProRes, the FCP most compatible video format. Here is how.


XAVC is an open recoding format that was introduced by Sony. It allows for a wide range of content production including intra frame recording and long group of pictures (GOP) recording. While, XAVC is the unfriendly video format across Apple Mac system and Mac applications like FCP. You may always fail to import XAVC to Final Cut Pro or other popular editing programs on Mac OS X.

So if you want to enhance the XAVC 4K videos in Final Cut Pro, but only find the files are not selectable? You can follow the easy guide to convert XAVC to ProRes in order to edit XAVC clips with Final Cut Pro 6/7/X easily. There is even no quality loss during the conversion as long as you apply a professional XAVC video converter.

Brorsoft Video Converter for Mac is the highly recommended tool for you to achieve the goal. Overall, the program is a professional yet all-in-one video conversion tool. With it, you can easily rewrap all XAVC/XAVC-S files to ProRes 422, ProRes 422 HQ or 4444 for using in Final Cut Pro X/7/6. It also provides simple video editing functions for you. Besides, the Mac video converter can also convert MXF, MTS, MP4, MOV, etc videos from HD camcorders (like JVC, Panasonic, Sony and Cannon) for editing in Final Cut Pro, Final Cut Express, iMovie, Avid MC, Adobe Premiere Pro etc. Just download it and follow the tutorial below to transcode XAVC to Apple ProRes for FCP X/7.

Converting XAVC to ProRes 422 MOV for Final Cut Pro

1. Load XAVC files to the Program

You can directly drag and drop the XAVC files to the software, or click “Add” or “Add From Folder” to locate the XAVC clips into the XAVC to FCP Mac converter.


2. Choose Apple ProRes as Output Format

Press “Format” option and navigate the mouse cursor to choose “Format > Final Cut Pro > Apple ProRes 422 (*.mov)” as the best codec for FCP 6/7 and FCP X on Mac.


Tip: Adjust the video and audio parameters, including the Bitrate of Video&Audio, Video Size, Sample Rate, Frame Rate, Audio Channels, etc., by clicking the Settings button on the main interface for getting the best quality. If you want to convert 4K XAVC to 4K ProRes, just keep the original video size and bitrate.


3. Start encoding XVAC to ProRes

Tap “Convert” button on the main interface to start XAVC to ProRes conversion with the best XAVC to ProRes 422 Converter on Mac OS X.

After the conversion, it is easy to import XAVC videos to Final Cut Pro 6/7/X for further editing.

More Guides:

Get Program for converting AVI to FCE format
Edit Sony F5/F55 XAVC files in Final Cut Pro 7/X
Sony XAVC codec to Avid Media Composer workflow
iMovie does not recognize MPEG 4- Any workaround?
Import Sony XAVC file to Windows Movie Maker for editing
How can i Convert Canon XF200 MXF to FCP/Avid/Premiere