[Big News]Brorsoft's iPhone Data Recovery Entitled iRefone Released - 50% Discount Off

[Big News]Brorsoft's iPhone Data Recovery Entitled iRefone Released - 50% Discount Off
Get Brorsoft iRefone for Windows and Mac by joning Brorsoft Facebook Community activities. Click Like button, you can get 50% Off Promo Codes.

Sunday, January 25, 2015

Make Canon Full HD MXF Accepted by Avid Media Composer 5/5.5/6/7 on Mac OS X (Yosemite)

Let’s learn about how to ingest our Canon Full HD MXF recordings to Avid Media Composer 5/5.5/6/7 for a nice editing here.

Source From: How to transcode Canon MXF to Avid Media Composer

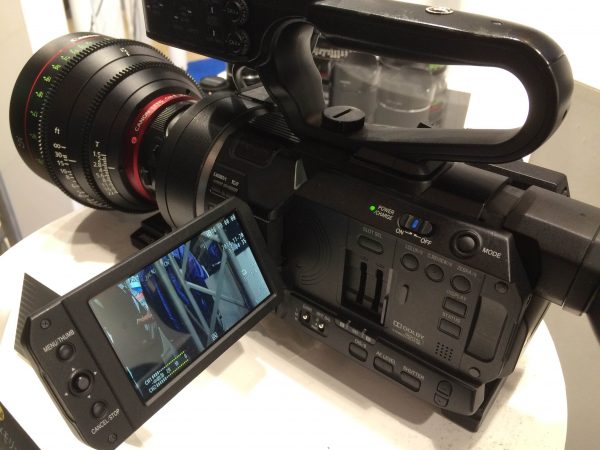
Videos produced by professional level camcorders like Canon XF series are in .mxf file formats, which could be a little tricky if your intention is to edit the MXF clips with Avid Media Composer. If you are fixed on Avid MC, one solution to address the incompatibility issue is to convert Canon MXF to Avid Media Composer supported file format DNxHD .mov.


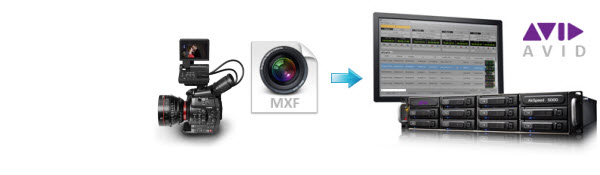
How to convert Canon MXF to Avid Media Composer DNxHD

What we need is a MXF to Avid MC video transcoding application, plenty of software can do transcoding, when we were to pick up a video converter, it is the output video quality, the variety of the output video options and the efficiency of transcoding process we need to put into consideration. Overall, Brorsoft MXF Converter for Mac is the best choice.

It is an optimal MXF converter for you, which can help you convert Canon MXF into a different format like DNxHD for Avid Media Composer with least quality loss. You should then be able to import the new file into Avid MC with smooth editing without any trouble. It will ensure a perfect MXF importing, playing and editing workflow with Avid Media Composer 4/5/6/7. Plus, it also provides the optimal presets like ProRes for FCP, AIC .mov for iMovie, MPEG-2 for Adobe Premiere Pro. If you are running on Windows, please turn to MXF Converter.

So, what does the workflow look like?

Step 1. Download, install and run the professional Mac Canon MXF Converter.

After connecting your Canon XF camcorder to Mac via USB, you can just drag and drop them to the program window. Or click “Add Video” to load mxf videos, otherwise you can “Add from folder” to load all the raw videos in .mxf format.

Note: Batch converting mode is supported, so you can add several files at a time.


Step 2.Choose DNxHD .mov for Avid Media Composer. Click on the “Format” bar and choose Avid Media Composer->Avid DNxHD(*.mov) as the target format.


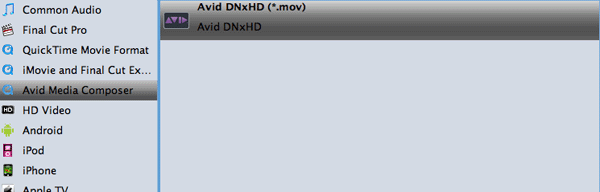
Tip: In case the default settings do not fit your requirement, you can click “Settings” button and enter “Profile Settings” panel to adjust video size, bit rate, frame rate, sample rate and audio channels.

Step 3. Click Convert button to start transcoding Canon MXF to DNxHD for Avid Media Composer.

Once the conversion completes, you can click “Open” to find exported videos which can be directly imported to Avid MC. You’ve done. As you see, now you can import and edit Canon MXF files in Avid Media Composer 5/5.5/6/7 without ANY problem.

Additional Tips:

If you want to edit Canon as well as Panasonic P2, Sony XDCAM HD MXF media in Final Cut Pro, please choose the “Final Cut Pro > Apple ProRes 422 (*.mov)” as output; For iMovie or FCE 4, choose the “iMovie and Final Cut Express -> Apple InterMediate Codec (AIC) (*.mov)”. For Adobe Premiere Pro, choose “Adobe Premiere/Sony Vegas —> MPEG-2(*.mpg)”. This MXF to DNxHD Converter can meet almost all of your demands.

More Guides:

MKV movie won’t play in iTunes 12- Solution
Using Canon H.264 MOV files in Premiere Pro How to Convert DVD ISO to MP4 on Mac OS X Importing DivX(AVI) into Windows Movie Maker Make DivX/Xvid files work in Premiere Pro CC/CS6 Importing and editing XviD in Windows Movie Maker Importing Sony EX3 MP4 files to Avid Media Composer Convert DVD ISO Videos to H.264 MP4 for iOS Devices

Tuesday, January 20, 2015

Edit D5200 MOV in Final Cut-Transcode Nikon D5200 H.264 video to FCP X/7/6 (Yosemite)

The post is written for people who are having issues while import Nikon D5200 H.264 MOV to Final Cut Pro 7/X for editing. If you are shooting with a Nikon D5200, you may wish to read it.

Source From: Make Nikon D5200 MOV edit in FCP 6/7/X on mac

The Nikon D5200 is a new 24.1megapixel DSLR camera that can record Full 1080p HD movies at 1920x1280 pixels / 25fps or 50i/60i with stereo sound. A high-resolution 3-inch vari-angle LCD monitor makes it easier to compose your shots from difficult angles, while the extensive ISO range of 100-25600 should cope with virtually all lighting conditions. A 5fps burst shooting mode, EXPEED 3 image processor, 39-point autofocus system with 3D Focus Tracking, 2,016-pixel RGB metering sensor, High Dynamic Range mode, Active D-Lighting, seven different special effects for stills and movies and a new generation GUI design complete the Nikon D5200 s headline specs.

Have you tried to import your clips from Nikon D5200 to FCP 6/7/X or other video editings? Well some Nikon users may have tried this before. But they may have met more or less problems.


In fact, H.264 MOV video format from Nikon D5100 is a long GOP format that is highly compressed. To be frankly, it is not a friendly format for FCP X editing. Thus it is difficult for the Nikon users to import these videos to FCP X for editing smoothly. If you want to import Nikon D5200 1080P MOV to FCP X on Mac for editing, you need to convert the 1080i MOV footages from Nikon D5200 with an easy-to-use tool first.

Here we recommend the best D5200 MOV to FCP Converter to you. You can convert/transcode Nikon D5200 MOV to a compatible format for FCP X on mac quickly and easily. Before editing the footages from Nikon D5200, you are advised to install the first-class Nikon D 5200 MOV to FCP X Converter on your mac.

Guide:
Step-by-step guide for all of you to make Nikon D5200 MOV edit in FCP 6/7/X on mac without quality loss.


Step 1: Import Nikon D5200 1080i MOV files to the best D5200 MOV to FCP 6/7/X Converter.Before imputing the clips from Nikon D5200 to the converter, you should connect your camcorder with your computer via USB cable, or you can copy the entire folder of the video to your computer directly.

Click the Add Button on the top of the main interface to import Nikon D5200 MOV to the best D5200 MOV to FCP X Converter.

Tip:You can double click the each file to have a preview.If necessary, you can tick the “Merge into one” box to merge D5200 1080i MOV files together.

Step 2: Select an output format for FCP X and set the output folder. Click on the dropdown menu of “Format” and then choose “Final Cut Pro”, you will find that there are many output formats for you to choose. You can choose the one that you prefer. Apple ProRes 422(*.mov) is the common output format for FCP.

After choosing the correct output format, you can set the output folder by clicking “Browse” icon to save your converted file as you like.

Tip:
1. If you just have FCP 7 or above, you can choose these formats about Apple ProRes you like, but if your FCP on Mac is just FCP 6 or earlier, pls choose Apple ProRes 422(*mov) or Apple ProRes 422 (HQ)(*mov) in that other 3 formats are not supported by FCP 6.
2. If you want the size of the converted files be smaller, you are advised to choose Final Cut Pro>Apple ProRes 422(LT)(*mov) as the output format.

Step 3: Click “Settings” icon to adjust audio and video parameters. You can adjust codec, bit rate, frame rate, sample rate and audio channel in the Profile Settings interface according to your demands and optimize the output file quality.

Tip: You’d better set the video frame rate as 30fps, video size as 1920*1080 to keep the best quality for editing Nikon D5200 1080i MOV in FCP X on Mac. (If you are recorded in PAL, the 25fps as the frame rate is the best choice for you.) If you wanna have a smaller file size but keep the good quality, you can decrease the audio or video bitrate.

Step 4: Start conversion of your Nikon D5200 1080i MOV file to ProRes for FCP X editing.Click the “Convert” button; it will convert Nikon D5100 1080P MOV to FCP X on Mac immediately. You can check the process in the “Conversion” interface.

Tip:
1. Deinterlace 1080i files: Click Edit and select "deinterlacing" in the Effect.
2. This professional D5200 MOV to FCP X Converter can also help you to transcode other video formats such as .mxf, .mov, m4v and so on for portable devices, HDTV or Editors.

Related guides:

Edit Sony FS700 footage in Final Cut Pro 7/X
How to transfer Sony PMW-EX3 MP4 to FCP X
Import Nikon D5500 videos to iMovie for editing
Transcode AVCHD to Apple ProRes for FCP X/7
Play your Yify torrent videos via Plex Media Sever
Import Nikon D5500 MOV to Premiere Pro on Mac OS X Import Nikon D5500 MOV footage into Premiere, iMovie, FCP Convert Nikon D5300 H.264 MOV clips to MPG/WMV/MOV for Premiere

Sunday, January 11, 2015

4K to MOV for Quicktime-Convert 4k video to QuickTime in Windows or Mac OS X Yosemite

Want to convert 4k videos to QuickTime for playback or other uses? Here, I recommend you a powerful yet easy-to-use 4k to QuickTime converter to do this great job.

A 4k video footage really gives the accurate proof on how far the graphics and photography industry has progressed upto. Watching 4k video is highly intriguing and gives real life experience to the viewers.But playing those super smooth and high definition videos is a Herculean task and can transform into an agony when you a lack a super computer.

It's a common situation that when dragging your 4k video files to QuickTime for playback , you'll be informed 4k is not in a format that QuickTime player understands.

Yes, QuickTime only natively supports a few video codecs such as H.264 and MPEG-4, which 4k video files aren't encoded with. Even if you can add a 4K video to QuickTime player, it is still an exercise in frustration- content on the display appeared tiny.

If you would like to play 4k video with QuickTime or edit these 4k videos in iMovie, FCP, you’d better convert 4k to QuickTime MOV format. The reason is that MOV files are compatible with Mac OS While 4k file can’t do such a good job compared to MOV. Read on to learn details.

To convert 4k to MOV, what you need is a video converter tool that supports the 4k file to MOV conversion without compressing the video quality.Brorsoft 4K Video Converter Mac, which is an all-in-one tool that can help you to convert and downscale 4K videos within one stop.

Just like the way it is dealing with 1080p videos, it is surely in the support of converting 4K videos in any formats faultlessly. With it, you can fast convert 4K Ultra HD videos in MP4, MKV, MXF, XAVC, WMV, AVI, or any other extension to QuickTime playable format with least quality loss. Plus, this 4K video converting software provides the optimal presets for portable devices like iPad, iPhone, Galaxy Tablet, Surface Tablet, Kindle Fire HDX; editing programs like Adobe Premiere Pro, Final Cut Pro, iMovie, Avid MC, etc for better enjoying, editing 4K files. It is also available to customize the output resolutions to any size the users want. For Windows users, turn to 4K Video Converter to ensure perfect 4K playback.

How to play, view 4K videos in QuickTime Player

STEP 1. Load 4K footage

Launch the 4K to QuickTime Converter Mac. Drag & drop 4K files to the program directly and your files would be added instantaneously. Or you can head to the "Add" button to locate the 4K videos you want to add.


STEP 2. Select output format

Click format you choose MOV as target format. This video app offers the QuickTime Movie Format for you. Or, you can also choose "Common Video -> MOV - QuickTime (*.mov)" as the output format.


STEP 3. Tweak video, audio settings

Click "Settings" button; you can adjust video and audio settings, including codec, aspect ratio, bit rate, frame rate, sample rate, and audio channel. To down-convert ultra HD 4K to 1080p for easier playback, you just need to adjust video size to 1920*1080.

STEP 4. Start 4K to QuickTime conversion

Hit the "Convert" button to let this smart converter start encoding 4K to QuickTime .mov on Mac OS X. When the conversion is done, you can play the converted 4K videos in QuickTime player without hassle.

Additional Tips: Some guys recommend third-party 4K video player apps like VLC, DivX Player, Media Player Classic, but all of them can't be an ultimate solution for all 4K videos. Based on out testing, we found VLC can't support 4K video well, Media Player Classic can play 4K movies but only on Windows... To have a smooth 4K playback on Mac/Windows, this professional 4K HD Converter is the best choice.

More Topics:

Edit DVD videos in Final Cut Pro under Yosemite
Convert/Import Nikon D5200 MOV files to FCP X/7/6
Main interface of the AVCHD to FCP Converter Yosemite
Edit Nikon D5500 MOV(H.264) file in Final Cut Pro 6/7/X
Transcode and import Panasonic AG-AC90 MTS in FCP X/7
MXF to ProRes 422, 422HQ, ProRes 4444 for Final Cut (Yosemite)
MTS to MOV conversion for Quicktime, Final Cut 7, FCP X, iMovie

Thursday, January 8, 2015

Edit MOV in Final Cut Yosemite-How to convert MOV to ProRes 422, 422HQ, ProRes 444 for FCP 7, FCP X

The guide will teach you how to convert MOV to Final Cut Pro compatible video formats so that you can easily convert MOV files to FCP 7, FCP X most compatible format Apple ProRes with fast encoding speed on Mac Yosemite.

Source From: How can I solve MOV to FCP incompatibility issues

In this day and age, everyone enjoys video shooting and editing. However, many users encountered issues when attempting to edit MOV files in Final Cut Pro. Let's see some frequently asked questions on MOV to FCP issue:

Q1: I am becoming more and more frustrated with this Nikon D800 camera... I am FCP 7 user, when importing Nikon .mov to FCP 7, it crashed. Can anyone help?

Q2: I'm new to Final Cut Pro X, and I'm trying to convert some .mov footage for editing, as FCP X can’t import my MOV video clips correctly.

As you see, more than one guy is facing the troubles when working MOV files in FCP X or FCP 7. Actually, .mov is just a wrapper. The bigger and better question is what's inside the wrapper (commonly called a codec). So you can have a .mov file that uses different codecs. It could be DV, HDV, XDCAM, DNxHD, ProRes, DVCPRO, etc. Each of those are different codecs that a .mov can contain. If the codec is Final Cut Pro unsupported one like H.264 or MPEG-4 which is highly-compressed and not suit for editing with non-linear video editing software, Final Cut Pro won't import those of MOV files for editing.

To help you solve the MOV to FCP incompatibility issue, here I share with you a simple guide on how to convert MOV to ProRes codec for editing in Final Cut Pro flawlessly.

1. Downloading the App- Brorsoft Video Converter for Mac

Overall, the MOV to FCP Converter is free, clean and safe to install and use. And only with barely several mouse clicks, you can get the whole job done. Besides MOV, it can also transcode more video file formats like MTS, MXF, M4V, AVI, MKV, MP4, VOB to Final Cut Pro most compatible Apple ProRes .mov without any quality loss.

2 .Load MOV files to the program

Launch the MOV FCP Converter and click "Add File" button to locate the .movie(s) you want to add. Check the "Merge into one file" box, you can join several .mov clips together if necessary.


3. Select output format

Click on "Format" bar and set a FCP friendly format in dropdown-list. You are advised to "Follow Final Cut Pro" template and "Apple ProRes 422 (*.mov)" format. By clicking the Settings icon, this MOV to ProRes Converter allows you to customize proper video/audio parameters if necessary.


4. Start MOV to ProRes conversion on Mac

Click the big "Convert" button at the bottom right corner to finish transcoding MOV to ProRes 422 for FCP.

When the conversion is done, you can find the output files by clicking "Open" button on the main interface, then you can transfer the encoded MOV files to your Final Cut Pro, FCP 7/6 to edit with ease. Once you've got your video edited, you can export to any codec/container that you'd like for playing and sharing.

See more:
How to Rip and Put a Blu-ray movie on Nexus 6
Brorosft Blu-ray Ripper for Mac OS X ( Yosemite)
Convert WMV to MOV (Quicktime) for Mac Yosemite
Play MKV fileson Yosemite with Mac Supported Format
Edit Sony PXW-FS7 XAVC 4K/HD in Final Cut Pro 7/X
Import Sony PXW-FS7 xavc 4k/hd video to Final Cut Pro 7
Converting Sony X70 XAVC for Editing in Final Cut Pro 7
Import unsupported MOV files into iMovie on Mac Yosemite
Importing Panasonic hc-x1000 4K/MOV/MP4 files to Avid MC

Saturday, January 3, 2015

JVC HM170 to Premiere Pro-GY-HM170E 4K H.264/MOV/AVCHD in Premiere Pro CS5/CS6/CC

The following paragraphs show us how to edit JVC GY-HM170 4KCAM footage with Premiere Pro without bogging down your computer. The process is surprisingly easy and can be done with the help of Brorsoft Video Converter for Mac.

JVC GY-HM170E (GYHM170E) 12.7MP Handheld Compact 4K Ultra HD CMOS Sensor Camcorder
While very compact, the economical GY-HM170E features a heavy duty body with professional control layout and comprehensive video profile settings for professional use. It is a fully functional high performance 4K Ultra HD camcorder that's equally capable of shooting 4:2:2 full HD at 50Mbps. Its integrated 12x optical zoom lens and 4K CMOS sensor, deliver razor sharp 4K Ultra HD recordings directly to SDHC/SDXC memory cards. It can even record on two cards simultaneously for instant backup or extended recording time. Output live 4K UHD camera signals through the built-in HDMI connector. And its tiny size allows you to shoot in venues that may be unfriendly to larger cameras.

Video recording:

Video codec: MPEG-4 AVC/H.264 (4K/HD), AVCHD(HD/SD)

File format : MOV(H.264), MTS(AVCHD), 4K(H.264)

As far as we know, the latest version Premiere Pro CS6, CC 7 usually can handle 4K files without much problem, but it is extremely hardware intensive. On the other hand, it is a complete nightmare to import JVC GY-HM1700 4K Ultra HD recordings to Premiere Pro - it cannot recognize H.264 codec and MTS format. To solve the issues, you need to convert JVC HM170E 4K video to MPEG-2 for Premiere Pro as primary delivery format.


To achieve the goal, you need the help from Brorsoft Video Converter for Mac.With it, you can effortlessly encode/re-encode JVC GY-HM170 4K H.264(MOV), AVCHD etc footage for smoothly importing and editing in various non-linear editing systems (NLE), including Adobe Premiere Pro, Avid Media Composer, Final Cut Pro, iMovie, FCE and more. If you work 4K files in Adobe Premiere Pro on Windows PC, please get Brorsoft Video Converter to solve the issues.

Download the JVC GY-HM170E 4K Video Converter for Mac

(Note: Click here for OS X 10.5)

Guide: JVC GY-HM170 4KCAM H.264, AVCHD files to Premiere Pro CC/CS best workflow

Step 1: Add JVC HM170 4K videos

Install and launch the JVC 4K Video Converter, and then click "Add Files" button to import your JVC HM170 4K clips to the software.

Tip: If you wanna combine many 4k video clips into one file, you can click the "Merge into one" box.


Step 2: Choose output format

Click "Format" pull down list to select Adobe Premiere/Sony Vegas> MPEG-2(*.mpg) as the best video format for Premiere Pro. WMV, MOV formats are the good choice as well.


Step 3: Convert JVC GY-HM170 video to Premiere Pro

Click the Convert button under the preview window; the converter will start encoding JVC GY-HM170 4KCAM footages for importing to Premiere Pro.

Some more helpful features of the Brorsoft 4K Video Converter:

1. Settings- Click it to customize audio and video parameters Video Codec, bit rate, frame rate, Audio codec, sample rate, audio channels. We advise you to adjust the A/V parameters to be the same with source footage so as to bear least quality loss at proper file size. Of course, if you don’t stick with 4K video, you can downsize 4k to 1080p for easier editing on your computer.

2. Editor (next to "Add" icon)- Click to set watermark, trim, crop, add subtitles, etc.

3. If you want to smoothly edit JVC 4KCAM footage in Final Cut Pro X or FCP 7/6, you just need to choose the "Final Cut Pro > Apple ProRes 422 (*.mov)" as output format; For iMovie, select "iMovie and Final Cut Express -> Apple InterMediate Codec (AIC) (*.mov)" in the second step; For Avid Media Composer, choose "Avid Media Composer > Avid DNxHD(*.mov)" as output.

Soon after the conversion is finished, just click "Open" button to get the converted JVC GY-HM170 footage for editing in Adobe Premiere Pro CS5/CS6/CC perfectly.

Related Articles:
Edit JVC 4K footage in Final Cut Pro
How can I solve MOV to FCP incompatibility issues
Import JVC GY-LS300 4K/HD clips to Final Cut Pro
JVC GY-LS300 4K videos/MOV files to Final Cut Pro
JVC 4K to Adobe Premiere Pro CC/CS6/CS5 Workflow
How to Import JVC GYHMQ10 4K .MP4/.MOV into FCP
Convert JVC GY-HMQ10 4K footage for Editing in Premiere
JVC GY-HM200 4KCAM H.264, AVCHD files to Adobe Premiere Pro