[Big News]Brorsoft's iPhone Data Recovery Entitled iRefone Released - 50% Discount Off

[Big News]Brorsoft's iPhone Data Recovery Entitled iRefone Released - 50% Discount Off
Get Brorsoft iRefone for Windows and Mac by joning Brorsoft Facebook Community activities. Click Like button, you can get 50% Off Promo Codes.

Thursday, February 26, 2015

Canon, Sony, JVC, RED, Panasonic MXF to After Effects-import MXF files into After Effects CS5/CS6 for editing

With MXF to After Effects Converter, you can convert Canon, Sony, JVC, RED, Panasonic MXF footage to AE best editing videos on Mac, letting you import MXF files into After Effects via MPEG-2 codec.

Source From: Transcoding MXF files to MPEG-2 for editing in After Effects

Q: “I want to edit my Canon C500 .mxf files in After Effects CS6, what should I do? And I take much time on importing MXF video into After Effects. The process is a pain in the neck…”

From Adobe official website, we can know MXF is a container format. After Effects can only import some kinds of data contained within MXF files. After Effects can import the Op-Atom variety used by Panasonic DV, DVCPRO, DVCPRO50, and DVCPRO HD video cameras to record to Panasonic P2 media. It can also import XDCAM HD files in MXF format. To import other type MXF files to After Effects for editing smoothly, a better way is to transcode MXF files to MPEG-2, which is a standard format for After Effects.

First of all, download Brorsoft MXF Converter.

It’s a professional MXF Converter for you to convert MXF to MPEG-2 for After Effects or other editable video formats, such as WMV for Windows Movie Maker, AVI to Pinnacle Studio, MPEG for Adobe Premiere Pro/Sony Vegas, etc ensuring maximum editing quality and efficiency. In a word, this MXF Converter must be your best choice when you need a Panasonic P2 mxf Converter, a Canon mxf Converter or a Sony XDCAM MXF Converter. You can do action with mxf files at anytime anywhere now! For Mac user, please turn to MXF Converter for Mac, which can solve all the MXF incompatibility issues on Mac OS X.

Transcoding Canon, Sony, JVC, RED, Panasonic MXF footage to After Effects editable format

Note: To convert MXF video you need to transfer the whole MXF file structure to HDD, because MXF systems produce split-file A/V (that is, the video and audio stored in separate files).

Step 1: Add mxf captured videos

Click "add video" button to import the mxf files to the top MXF to After Effects Converter. Click “add from folder” button to add MXF folder. The software will find corresponding audio content by itself and mix it to video during conversion.


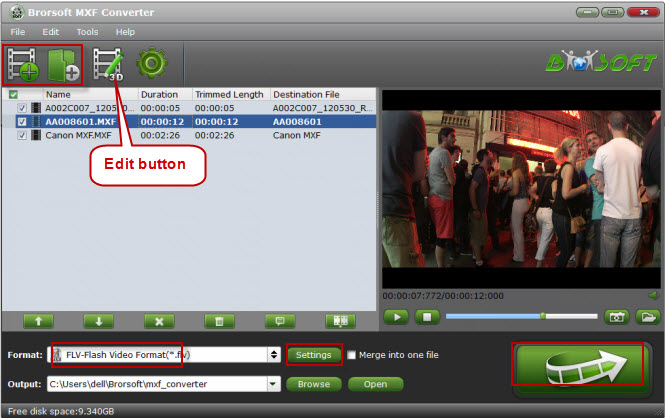
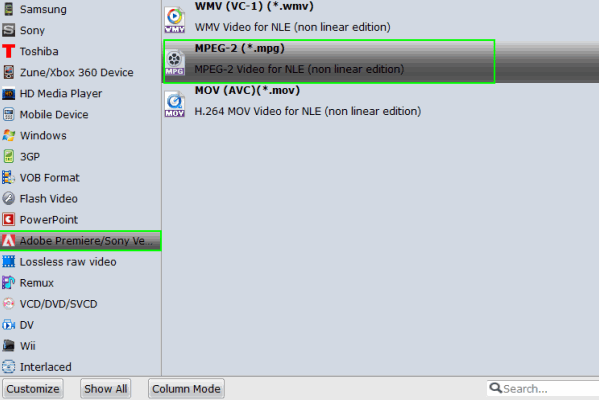
Step 2: Select output format

Click “Format” bar and choose "Adobe Premiere/Sony Vegas > MPEG-2 (*.mpg)” as output format on the drop-down menu. Of course, you can also choose AVI, MP4 from “Common Video” as the output format.


Tips: Click "Settings", you can set bitrate and frame rate, audio sample rate and more if necessary.

Step 3: Start the MXF to MPEG-2 Conversion

Click "Convert" to start converting Panasonic/Canon/Sony XDCAM MXF file for After Effects. After conversion, you can easily import the MXF to Adobe After Effects for editing keeping original quality without any trouble.

More Guides:

How to stream AVI to Plex Media Server
How can i use VOB files in After Effects CS5/CS6
Convert Sony FS7 XAVC to ProRes MOV for FCP on Mac
How do I edit H264(MP4/MOV) video files in Sony Vegas
Convert Nikon D810 MOV to MPEG-2 for Vegas Pro 12/13
How do I add/attach subtitles(SRT, ASS, SSA) to a .AVI file?
Transcoding 4K clips to Apple ProRes for working with FCP X
2 Parts Guide you to Transfer AVI from PC to Tivo for Playback
Play and Edit YIFY Torrents Movies on Portable Devices Or NLE
Convert Sony PXW-X70 XAVC to DNxHD for Avid Media Composer

Tuesday, February 24, 2015

AVI to Tivo-2 Parts Guide you to Transfer AVI from PC to Tivo for Playback

This article provides an easy way to do AVI to TiVo converison and upload it to your TiVo (including TiVo series 1, series 2 and series 3). 2 parts will be included. If you are interested, then hurry to CHECK IT OUT!

It's a great idea to transfer your own movies or videos from your PC or Mac to TiVo for playback on your big screen TV. However, AVI is not compatible with TiVo, so we need to convert it to TiVo format first, such as MPEG-2. In this case, a professional Video file conversion tool becomes a must, here i recommed Brorsoft Video Converter, which is an all-in-one video converter tool that lets you effortlessly convert your video and audio files from one format to another at ultra-fast speed. It supports a wide range of formats like MKV, VOB, MXF, AVCHD (.mts/.m2ts/.m2t), TiVo, MPEG, WMV, MP4, FLV, 3GP, AVI, AVCHD, etc., and includes presets for popular devices like iPhone, iPad, iPod, Samsung Galaxy Tab, HTC, Nook Tablets, Amazon Kindle Fire HD, Google Nexus 7/10, etc. What’s more, the built-in editor lets you personalize your videos before the conversion.

Next follow me to Make it Possible ~~~

Download the best Video Conversion Software:


Part I: How do I convert AVI movies to Tivo for Playback?

Step 1. Add AVI to converter
Download, install the AVI to Tivo Converter. As long as you launch it, the following main interface will pop up. Now you can click on “Add” button to import AVI files which you want to convert into this program.

Tip: If you want to join all the AVI files you loaded as a single file, you can tick checkbox “Merge into one file”.

Step 2. Choose MOV as output format

Hit the drop-down list of “Format” to choose "Common Video -> MPEG-2 Video(*.mpg) as the best format.

Step 3. Set advanced settings

By clicking the Settings icon, you can adjust video and audio parameters like codec, bit rate, frame rate, sample rate, etc., in that way, you can take charge of the size and quality of the output files. In principle, the larger input values, the better output quality, but the corresponding larger file size.

Step 4. Star conversion

As soon as all the above settings are completed, you can press “Convert” button to start AVI to MPEG-2 conversion. If you are busy, you can set "shut down my computer after the video conversion".

After conversion is done, simply click “Completed” to back to main interface, and click “Open” button to find generated output videos and then transfer it from your PC to Tivo flawlessly.

Part II: How do I transfer home videos from my PC to my TiVo?

To transfer home videos from your PC on your home network to your TiVo media device, you must have purchased the Home Networking Package, and downloaded and installed the TiVo Desktop 2.8 software (which comes as part of the Home Networking Package).

To make sure you’re using TiVo Desktop 2.8, launch TiVo Desktop and go to Help > About TiVo Desktop.

Step 1
On your PC, open My Documents > My TiVo Recordings.

NOTE: You can change the location of this folder under File > Preferences.

Step 2 Copy the home videos you wish to transfer to your TiVo into the My TiVo Recordings folder.

Supported files include:

Windows Media Video (.wmv)
QuickTime Movie (.mov)
MPEG-4/H.264 (.mp4, .m4v, .mp4v)
MPEG-2 (.mpg, .mpeg, .mpe, .mp2, .mp2v, .mpv2)
DivX and Xvid (.avi, .divx)

Step 3
These will now display in your TiVo Desktop’s Now Playing List.

Step 4 On your TiVo, navigate to TiVo Central > Now Playing List.

Step 5
Scroll down to the bottom of the list and select your “Now Playing on [YOUR PC]”.

Step 6 Select the video you wish to transfer and follow the screen prompts to begin the transfer.

Step 7
While the video is transferring, a blue light will be lit on your TiVo media device.

Step 8 Once the blue light turns off, the video has finished transferring. You can find the transferred video in your TiVo Now Playing List.

NOTE: Video can be played whilst transferring but network speed limitations may cause video to pause.

NOTE: Your TiVo media device will only transfer one file at a time; additional files will be queued for transfer later.

TIPS:

If you not only wanna convert videos, but also intend to convert Blu-ray/DVD movies, the all-in-one tool, Brorsoft Blu-ray Video Converter Ultimate will be your first and best choice.

More Useful Topics:

How to stream AVI to Plex Media Server
How to Convert VOB to After Effects editable format
Solution for Sony PMW-300 XACAM and FCP X/7/6
Efficient Way to Edit Blackmagic 4K in Final Cut Pro 7
How do I edit H264(MP4/MOV) video files in Sony Vegas
Convert Nikon D810 MOV to MPEG-2 for Vegas Pro 12/13
Transcoding 4K clips to Apple ProRes for working with FCP X
Transcoding MXF files to MPEG-2 for editing in After Effects
Play and Edit YIFY Torrents Movies on Portable Devices Or NLE
How to Import Nikon D810 H.264 MOV Files to Premiere Pro CC
Best Workflow for Editing Sony PXW-FS7 XAVC footage in FCP 7/X
Best MPEG Streamclip Alternative for Mac to convert video files to any format

Monday, February 16, 2015

F65 MXF issues with Adobe PP-Convert Sony F65 4K MXF videos to MPG for Premiere Pro CC/CS6/CS5

Met some issues while importing Sony F65 4K MXF videos to Premiere for editing? Here this article will teach you how to smoothly edit Sony F65 4K MXF videos in Premiere Pro CC/CS6/CS5.

Source From: Edit Sony F65 4K MXF videos in Premiere CC/CS6/CS5

The newest member of the CineAlta family-Sony F65 captures MXF images in 4K (4096 x 2160) resolution and features a speedy 20.4 megapixel, Super 35mm CMOS sensor, capable of reaching up to 72fps at 4K resolution and 120fps on 2K. Nowadays, 4K becomes much popular which would give better and wider viewing of a frame, with much more crisp result. However, it is much complex for newbies taking on a 4K MXF video to Premiere workflow for the first time. Here are some essential things that you need to know.


Although Sony provides a plug-in to support support for Sony RAW MXF files (F65, PMW-F55/F5 and NEX-FS700) in Adobe Premiere Pro CC and CS6 products, allowing viewing and editing capabilities, users still encounter problems while editing Sony F65 4K MXF videos in Premiere:

"I used Sony plug-in to load my Sony F65 4K MXF videos into Premiere CC, but why Premiere CC crashed at the very beginning? I even had no chance to preview my videos. Pls help, I need to edit Sony F65 MXF clips in Premiere. Thank you in advance.

In fact, MXF is a kind of container file format encoded by various compression and encoding schemes. Premiere Pro can import these container files, but the ability to import the data that they contain is dependent on the codecs (specifically, decoders) installed. In short, it is difficult for Premiere (CC/CS6/CS5) to handle MXF videos natively. The simple workaround here to make Sony F65 4K MXF files editable in Premiere is to transcode MXF format to MPEG-2-a friendly video format for Premiere.

To achieve the goal, here Brorsoft Video Converter for Mac is highly recommended to you which can help you perfectly encode Sony F65 4K MXF to MPEG-2 for Premiere. Besides Premiere output column, it also offers other professional codecs for NLEs such as Apple ProRes for FCP, AIC for iMovie, DNxHD for Avid .etc. If you are a PC user and eager to edit 4K MXF videos in Premiere, pls turn to Brorsoft Video Converter windows version. Now, download the software you need and follow below guide to start conversion.

How to Convert Sony F65 4K MXF videos to MPEG-2 for Premiere CC/CS6/CS5

Step 1: Install and launch the Video Converter to your Mac, and then load source MXF clips to the software. You can import MXF clips to the program through "Add Video" button or "Add from folder" button.


Step 2: This powerful Converter offers optimized format preset for Adobe Premiere. For encoding MXF to Premiere, please click "Format" menu firstly and then follow "Adobe Premiere/Sony Vegas" > "MPEG-2(*.mpg)". WMV, MOV formats are the good choice as well.


Tip: Click the "Settings" button, you are able to enter the "Profile Settings" panel to adjust video and audio parameters for 4K MXF source files, including video size, bit rate, frame rate and more.

Step 3: Tap Convert button to start transcoding Sony F65 4K MXF to MPEG-2 for Premiere CC/CS6/CS5 on Mac OS X(Yosemite included).

Once the conversion completes, you can click "Open" to find the .MPG videos which can be imported to Premiere directly. Enjoy your editing journey!

Read More:
How to Add subtitles to AVI?
Avid Media Composer MTS files workflow
How to upload GoPro Hero4 4K to YouTube
Editing Sony FS7 4K XAVC Video Smoothly
Convert and Import VOB to iTunes Mac Guide
Downscaling Ultra HD 4K to 1080p Video Easily
Rip Blu-ray ISO files Playback via WD TV Live(Plus, Hub)
Simple Workflow on editing 4K video files in iMovie 11/09/08
Rip and Convert Blu-ray/DVD movies to WD TV Live H.264 MP4
Solution to Solve FCP Won't Import Nikon D810 H.264 MOV Problem

Friday, February 13, 2015

Mac Import Canon XF100/XF105 MXF to ProRes for FCP X/7/6 (Yosemite & Mavericks)

Follow the guide you can convert Canon XF105/XF100 MXF to Prores encoded video files on Mac so you can edit them in Final Cut Pro, iMovie and more editing apps.

Perhaps you have got some MXF files from Canon XF100/XF105 and need to add them to Final Cut Pro for editing on Mac. But, it's a headache to edit MXF video in Final Cut Pro (X) since it's not recognized by FCP X/7/6.

In order to successfully import MXF files to FCP for editing, some people choose to using Canon Softwares to help with XF100/XF105 MXF in FCP at free. However, it is a tedious process, which needs your patience.With a lot of steps and may cause errors due to incompatible codecs, Also spends a lot of time still occupies a large amount of RAM, what's worse, only available for Canon MXF files and doesn’t work well wtih 50Mbps (CBR) 4:2:2, 1920×1080, (60i/30p/24p).

Oh~Hearing this, if you are like me, have felt a large head of it, it is too cumbersome, then, is there a simpler way???

The answer of course is yes.The best solution is to convert MXF to FCP supported video formats like ProRes MOV. Simply follow this article to learn how to convert XF100/XF105 MXF video to FCP ProRes on Mac OS X (Mountain Lion and Mavericks included), then you can edit them in any video editing software.


Brorsoft MXF Converter for Mac here is highly recommended as the best application for Mac users to convert camcorder Canon XF100/XF105 MXF files to ProRes MOV with ease. In addition to ProRes, it can also convert MXF to other popular video formats like MP4, MOV, AVI, WMV, MKV, FLV, 3GP, VOB and more. The applied leading acceleration technology guarantees fast conversion speed and high output video quality. Get it now and follow the steps below to convert your MXF movies.

And this program is fully compatible with the latest OS X 10.8 Mountain Lion (Mavericks & Yosemite included). Download it and have a try.


Guide:How to convert MXF files from Canon XF100/XF105 to ProRes encoded videos for FCP X/7/6 on Mac

Step 1. Load MXF files

Launch the best Canon XF105/XF100 MXF to FCP Converter, and add MXF videos to the program by clicking “Add” button. Or simply drag and drop the MXF videos into the display window. Note that batch conversion is well supported so you can add multiple videos for conversion at a time. After the files are loaded, you can preview them, take snapshots, merge videos, etc.


Step 2. Select ProRes as the output format

For editing MXF media in FCP smoothly, choose “Final Cut Pro> Apple PreRes 422″ as the output format.


Tip: If need, you can click “Settings” to freely change the video and audio settings. To keep the best quality for editing, you’d better keep your original settings. For example, if your resource file is 1080 29.97p or 59.94i, you’d better select the video size as 1920*1080 and frame rate as 29.97fps.

Step 3. Choose the output folder and start to convert

Next, click Output to set a destination folder to save the converted video files and click Convert to start the video conversion. The conversion will complete soon and after that you can import your MXF files to any popular Mac video editing tools to make a gorgeous home movie!

More Topics:

Work XAVC Media in Premiere Pro CC/CS6/CS5/CS4
Editing 1080p AVCHD from Canon EOS C100 in iMovie
Trancoding XAVC to Final Cut Pro friendly ProRes codec
Rip DVD movies into MP4 format for Asus Zenfone 2 playing
Tips working Sony F3 XDCAM EX MP4 video in Premiere Pro
Load Panasonic DMC-GF7 AVCHD MTS to FCP 7, FCP X on Mac
Get Canon XA25 AVCHD(.MTS), MP4 video into Final Cut Pro X/7
Converting M2TS/M2T to DNxHD .mov that Avid Media Composer
How to Edit Canon EOS 7D Mark II MOV videos in FCP, iMovie, FCE

Sunday, February 8, 2015

DVD/ISO to Zenfone 2-Guide to Make you Playable DVD, DVD iso Files on Asus Zenfone 2

“Need I use an ASUS Zenfone 2 DVD converter to convert DVD to ASUS Zenfone 2 videos and then transfer DVD to ASUS Zenfone 2? What ASUS Zenfone DVD converter should I use and how to convert DVD to ASUS Zenfone 2? ”
Check the following steps to know how to rip and convert DVD, DVD ISO files to ASUS Zenfone videos.


Asus recently came out with their brand new flagship, the ZenFone 2, unveiling it at CES 2015. And while initial reactions to the phone weren’t anything spectacular (though still positive as a whole), people still noted the overall attractive package of features and the solid design that the ZenFone 2 seems to have behind it. Plus, it should also not be forgotten that this is an actual 64-bit phone, with its 2.3 GHz Intel Atom processor.

Many movie lovers gather lots of DVD discs in their home. Meanwhile, in order to avoid DVD discs damaged. They often back up DVD movies on their computer via some tool. The most common DVD backup files including DVD folder, DVD ISO or IFO image file. If you just one of them, you may just plan to put DVD files on Asus Zenfone 2, haven’t find an effective way to make it?


If you are looking for a professional yet easy-to-us DVD tools, Brorsoft DVD Ripper is highly recommended to you which can help you rip and convert almost commercial DVD Discs even DVD ISO/IFO files into common MP4 for playing on Asus Zenfone 2 or other portable devices including iPad, iPhone, Apple TV, Kindle Fire, Samsung Tab, Surface RT .etc with optimized profile. If you are a Mac user (Yosemite included), pls get the equivalent Mac version Brorsoft DVD Ripper for Mac. Now, download the software on computer and follow the below guide to start DVD to Zenfone 2 conversion.

Download DVD ISO Converter for ZenFone:

(Note: Click here for OS X 10.5)Easy way to convert DVD/ISO for playing on ASUS ZenFone

This guide describes converting DVD to ZenFone on Windows(Windows 8 compatible). Note that the way to put DVD to Zenfone on Mac is the same. Just download the right version and follow the intuitive software interface.

[b]Step 1. Load DVD info


Insert a source DVD in optical drive. Install and launch the excellent DVD ISO to ZenFone Converter, click disc button to load DVD movies. You can select subtitles and audio track (English, French, German, Spanish...) for each chapter. Forced subtitles can be attained, too.


Step 2. Select Zenfone friendly format

The same as other Android tablets and smartphones, ASUS Zenfone well support MP4 video files. Here, you can go to Format > "Common Video" and select "H.264 Video(*.mp4)" as the output video format. Or you can choose "Asus" > "Asus PadFone 2 H.264 Video(*.mp4) ", which could fit on Asus ZenFone perfectly.


Tip: If you think the video size and image quality are not suitable for your Asus smartphone, you can first choose any one of the provided types, then change the settings. Please remember the file size is based more on bitrate than resolution which means bitrate higher results in bigger file size, and lower visible quality loss.

Step 3. Convert and transfer DVD ISO to Zenfone

Hit "Convert" button to start converting, copying DVD ISO movie to Zenfone MP4 format.

After conversion click "Open" to find converted videos and transfer them to your Zenfone through a USB with ease. There, now you know how to get DVD movies onto your Asus ZenFone, so you can watch them on that gorgeous screen!

More Topics:

Converting VLC videos to Vimeo MP4 video
Ripping DVD to iMovie 11/10 on Mac Yosemite
Rip and Copy Blu-ray library to Plex Media Sever
How can i use a VOB files in Windows Movie Maker
VOB to Adobe Premiere Pro CC/CS6/CS5 Workflow
Load all movies from Blu-ray/DVD to Acer Iconia Tab 8
Convert Blu-ray, DVD and ISO files to iTunes compatible
Convert DVD movies for iMovie (iMovie 11) on Mac OS X
Converting M2TS/M2T to DNxHD .mov that Avid Media Composer

Thursday, February 5, 2015

Editing 1080p AVCHD from Canon EOS C100 in iMovie 10/11/9/8/HD on Mac (Yosemite)

By learning this guide, you will get the tips and tricks of converting AVCHD 1080p from Canon EOS C100 to iMovie more compatible video format in simple steps.

The Canon C100 records to SD cards using MPEG-4 AVCHD 4:2:0 at bitrates up to 24Mbps.The captured footage carry TS, M2TS or MTS extension that most video editing programs and media players cannot recognize. Although Apple has announced that iMovie (iMovie 11) does support the AVCHD format used by digital camcorders. However, when you import AVCHD from Canon EOS C100 to iMovie for editing, you'll still have lots of problems because of the video codec, resolution, Mac processor, camcorder model, etc. The truth is, AVCHD is really not that a friendly video format for iMovie.


In order to successfully import all kinds of AVCHD from Canon C100 to iMovie for Mac or iOS, a recommended solution is convert AVCHD to iMovie more supported video format.

Brorsoft MTS Converter for Mac is just the ideal AVCHD to iMovie Converter. It supports converting various AVCHD movies to iMovie more supported MP4 or MOV. Plus, with it, you can also transocde AVCHD recordings to Apple ProRes for FCP, DNxHD for Avid Media Composer, MEPG-2/MOV for Adobe Premiere Pro, etc. So far I never had any issue with it and it's pretty straight forward intuitive user friendly software.

If you are facing the problem likewise, just download it and go through the tutorial below.
Supported OS:

Mac OS X 10.9 Mavericks, 10.8 Mountain Lion, 10.7 Lion, Snow Leopard 10.6, Leopard 10.5
(Note: Click here for OS X 10.5)


How to transcode Canon EOS C100 AVCHD to AIC MOV on Mac?

Step 1. Run the best MTS Converter on Mac. Then add 1080p Full HD .MTS, .M2TS file to the program.

Tip: Check the box of "Merge into one file", you can batch convert several AVCHD files.

Step 2. Click “Format” and move your pointer to "iMovie and Final Cut Express" Category and choose "Apple Intermediate Codec(AIC) (*.mov)" format. It ensures the perfect editing with your AVCHD files in iMovie program.


Step 3. Freely set video resolution(1920×1080/1440×1080/1280×720/720×480), bitrate(from 1Mbps to 20Mbps), frame rate (24p/25p/30p) by clicking "Settings".

Note: If your AVCHD file is 1080 50p, you need to set the frame rate as 25p while 1080 60p for 30p.

Step 4.Start the fast AVCHD to AIC conversion for iMovie via clicking Convert button.

After the conversion, click "open" to find the converted video. Then you can smoothly put the Canon C100 1080 60P mts file to iMovie for editing with best quality.

Additional Tip:

Edit your raw MTS clips with this best AVCHD to AIC Converter for Mac:

By clicking “Edit” button, you can trim, crop the video, or add watermark and adjust effect, attach (*.srt, *.ass, *.ssa) to the videos which you will convert.


Trim – Choose to reserve the part you need. Just choose the chapter which you need to trim, to set “start time” or “end time”, type the portion which you want to save.

Crop – Remove black edges of your video or just get the scale of this video you want.

Effect – Adjust the effects by adjusting the parameters, such as:

1) Deinterlacing – If there are some stripes on the picture, you can check this option to make a better picture effect. (Checked by default)

2) If you want to get 3D effect, just enable this functions and do settings.

Subtitle - Add *.srt, *.ass, *.ssa to the videos which you will convert.

More Topics:

Edit Panasonic Lumix GF7 MTS in FCP 6/7/X
Work XAVC Media in Premiere Pro CC/CS6/CS5/CS4
Trancode Panasonic AJ-PX270 P2 MXF for editing in FCP
Importing Canon XA25 1080p AVCHD MTS files to FCP 7/X
Transcode Canon C300 MXF to Apple ProRes MOV for FCP 6/7
How to Edit Canon EOS 7D Mark II MOV videos in FCP, iMovie, FCE
Convert Canon C300 MXF to MPG/MOV/WMV for using in Premiere Pro

Tuesday, February 3, 2015

EOS C500 and Premiere Pro-Using Adobe Premiere to work with Canon EOS C500 4K/2K/HD MXF files

Here we supply the best solution talking about how to convert Canon EOS C500 MXF footages to Mac Premiere Pro CC, CS6.

The new EOS C500 comes out with support for 4K RAW output. Canon offers new possibilities for your imagination and creativity.

Supporting next-generation 4K-resolution video capture and RAW data output, the EOS C500/EOS C500 PL will achieve exceptional video results without any loss in quality. The camera’s uncompressed 4K output will unleash the full potential of Canon’s premium range of EF Cinema Lenses, combining with Canon Log Gamma, which delivers the high-quality video and wide exposure latitude required by digital cinematographers. Support for frame rates up to 120p in both 4K and 2K resolution will provide enhanced creative flexibility, enabling high-speed (slow motion) video capture in high resolution.

Recording file format 4K/2K: Dependent on external recorder

HD: Material eXchange Format (MXF); OP-1a pattern

Many EOS C500 users get the problem that the Adobe Premiere Pro,for example CS6,does not support 4k/2k or HD MXF files and that they have to transcode it first. Technically, the video formats that Adobe Premiere supports are MP4, MOV and MPG. So if we want to import 4k/2k or MXF files from Canon C500 to Adobe Premiere Pro CS4, CS5, CS6 or CC, first we need to convert C500 video clips to Adobe Premiere editable format.


To achieve the goal, Brorsoft Video Converter for Mac is highly recommended here. The program is an easy-to-use yet professional Canon 4k/2k/HD MXF Converter for Mac. It's able to convert video files from Canon EOS C500 to Mac fully compatible format and keep original quality at the mean while. This software can export MPG/MOV/WPG for Premiere Pro, Prores for Final Cut Pro, Apple InterMedaite Codec(AIC) for iMovie/FCE, DNxHD for Avid Media Composer and more NLE systems for native editing.

Below are some useful tips for you and you will know how to import and edit Canon EOS C500 4K/2K/HD MXF to Premiere Pro CC/CS6/CS5 on Mac.If you are windows users, please get Brorsoft Video Converter to solve the problem.

Supported OS:

Mac OS X 10.9 Mavericks, 10.8 Mountain Lion, 10.7 Lion, Snow Leopard 10.6, Leopard 10.5
(Note: Click here for OS X 10.5.8)


How to transcode C500 4K/2K/HD MXF files to MPEG-2 for Premiere Pro CS6/CC7 on Mac

Step 1: Go to download and install the professional Canon C500 footage Converter for Mac. Drag and drop the 4k/2k/HD MXF files from C500 to the Converter you have set up just now.


Step 2: Hit the Format box and select Adobe Premiere/Sony Vegas --> MPEG-2(*.mpg), WMV(VC-1)(*.wmv) or MOV(AVC)(.mov) as output format.

Step 3: Click on "Settings" to redefine output quality. You can also set a different video resolution (1920x1080/1440x1080/1280x720/720x480), frame rate (24p/30p), bitrate, audio channels, etc. For users who would like to retain exactly the same settings (without any quality loss), set target settings the same to source video.

Step 4: Click "Convert" to start transcode C500 video clips to MPEG-2/WMV for Adobe PP CS6 editing on Mac OS X 10.9(Yosemite & Mavericks).

After conversion, please click "Open" to find the exported video. Then, you can copy the converted file to Adobe Premiere Pro CS6 for playback and editing without any obstacle.

More Topics:

Converting EOS 700D H.264 MOV to Vegas Pro format
Transcode Nikon D5200 H.264 video to FCP X/7/6 (Yosemite)
Convert Canon EOS C100 Mark ii to FCP X acceptable format
Converting Canon C100 MTS files for editing in Sony Vegas Pro
Encoding EOS 700D ( Rebel T5i ) H.264 to Final Cut Pro Editing
How to convert MOV to ProRes 422, 422HQ, ProRes 444 for FCP 7
Convert Sony PMW-300 footage to AIC MOV for iMovie 11/10/09/08
Importing .MOV files from Canon 700D to Mac Premiere Pro CC/CS6
Importing Canon PowerShot MVI to Adobe Premiere Pro CS5/CS6/CC
Edit Canon C100 mark ii 1080 60p AVCHD in Avid Media Composer