![[Big News]Brorsoft's iPhone Data Recovery Entitled iRefone Released - 50% Discount Off](http://1.bp.blogspot.com/-EFfGrIMRojc/VVG1jwLqb1I/AAAAAAAAAFI/LrX6-8YNFvg/s1600/irefone-half-price-facebook.jpg)
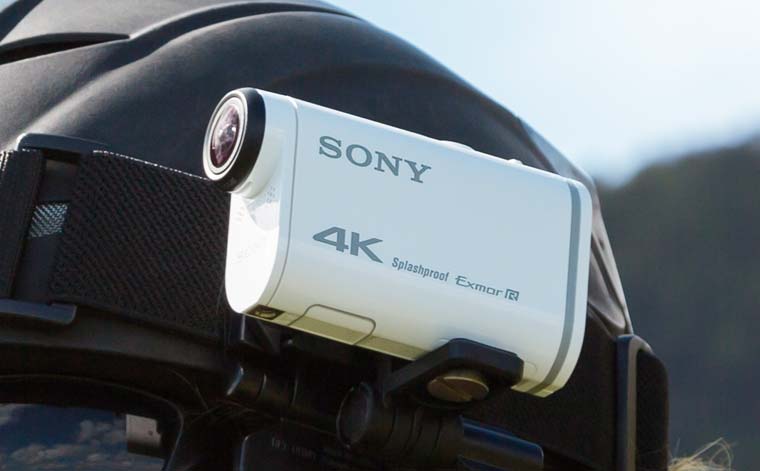
The Sony FDR-X1000 is small, lightweight and slash proof, but shipping with a case that is fully waterproofed. The wide angle Zeiss lens provides up to 170° FOV (field of view), shooting onto microSDs and powered by a removable battery. It records in 4K up to 30, 1080p up to 120fps and 720p up to 420fps. About the same as the GoPro Hero 4, right? The sting in the tail is the implementation of Sonys XAVC S codec, far more robust than GoPro’s H.264 options.
If you recorded some videos by Sony FDR X1000, you may like editing the 4K or 1080P HD video on Mac. Of course, Final Cut Pro is your best choice. With this professional Mac editing software, you can do anything as you want. But, we can't import the XAVC S MP4 videos from Sony FDR X1000 to FCP directly.
As we all know, Final Cut Pro works best with clips in the ProRes MOV format, the easy workaround is, get a Mac ProRes Converter for FCP and convert Sony FDR-X1000 XAVC S to Apple ProRes, which will save you both time and trouble, and all you need is to drag the result videos for prompt editing.
To make the task more convenient to achieve, a professional Converter-Brorsoft Video Converter for Mac is highly recommended to you. With it, you can effortlessly transcode Sony FDR-X1000 XAVC S files to Apple ProRes - ensuring maximum editing quality and efficiency when working with Final Cut Pro (no matter Final Cut Pro X, FCP 6 or FCP 7). The conversion is darn easy to be finished with only three clicks without loss of video quality. Click the Download button below to get the program and check out the easy steps to convert and import Sony FDR-X1000 XAVC S videos to Final Cut Pro without any troubles.
Download Sony FDR-X1000 XAVC S Video Converter on Mac
 (Note: Click here for OS X 10.5)
 How to Convert Sony FDR-X1000 XAVC S footage for Editing in FCP
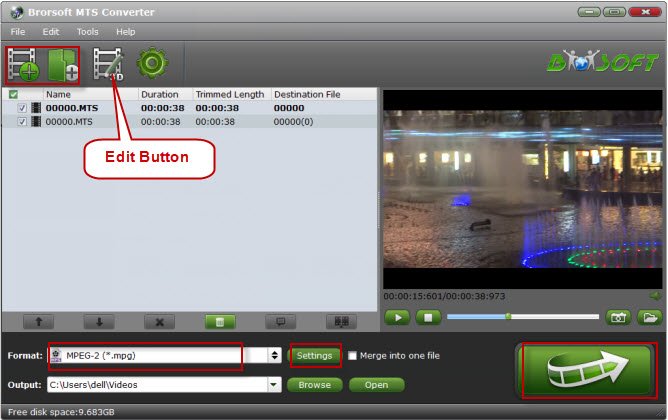
Step 1: Install and launch the mac Video Converter and load the recordings to it. If you want to merge several clips, just need to check the "Merge into one" box.

Step 2: Tap the Format bar and select Final Cut Pro > Apple ProRes 422 (*.mov), which is the best format for FCP.

Tips: (Optional) Choose "Settings" to set video resolution
(1920 x 1080/1440 x 1080/1280 x 720/720 x 480), bitrate(from 1Mbps to 20Mbps), frame rate (24p/30p) as you like. To deinterlace, crop, trim Sony FDR-AX1 XAVC S videos, click "Edit" menu.
Step 3: Press "Convert" button to start transcoding Sony FDR-X1000 XAVC S to ProRes 422 for Final Cut Pro.
When the conversion process shows in 100%, you can easily and effortlessly locate the converted ProRes .mov files by clicking the "Open" button in the main interface. Then, you can bring and edit Sony FDR-X1000 XAVC S footage in Final Cut Pro without any issue.
Additional Tips:
If you also wanna convert Sony FDR-X1000 XAVC S video files on Edius, Sony Vegas Pro, Adobe Premiere Pro , iMovie, FCP... you can apply this professional all-in-one tool Brorsoft iMedia Converter for Mac or Brorsoft Video Converter Ultimate for Windows.
If you have problems when importing or editing your Canon, Sony, Panasonic etc, camera video files, you can check out “Brorsoft Camcorder/Camera Importing Tips" or "FCE, FCP, iMovie Column"to get your solutions.
Related Guides:
4K workflow with FCP
4K workflow with Premiere
4K Ultra HD Video Converter
4K workflow with Sony Vegas
How to Edit Sony F55/F5 XAVC in Premiere Pro
How to Import Sony XAVC file to Pinnacle Studio
Editing Canon XF100 MXF files in Final Cut Pro X
Importing Sony A7S AVCHD fles to Avid MC 8.5.3
Working Sony PMW-500 MXF files in Final Cut Pro X
How to load Sony XAVC file to Windows Movie Maker
Impoting Canon C500 MXF to Premiere Elements 15/14/13
Convert Panasonic HC-PV100 AVCHD files to Pinnacle Studio
Best Workflow for Editing Sony A7S AVCHD files in Sony Movie Studio