[Big News]Brorsoft's iPhone Data Recovery Entitled iRefone Released - 50% Discount Off

[Big News]Brorsoft's iPhone Data Recovery Entitled iRefone Released - 50% Discount Off
Get Brorsoft iRefone for Windows and Mac by joning Brorsoft Facebook Community activities. Click Like button, you can get 50% Off Promo Codes.

Tuesday, November 29, 2016

Video Converter for macOS Sierra- Best Ways to Convert Videos on macOS Sierra

In the past year we have show you how to convert videos on Mac OS X 10.11 El Capitan. In this article we aim to show you how to convert/encode AVI, MKV, WMV, MPG, FLV, VOB, TiVo files when you updated from El Capitan to macOS Sierra. 


Working on macOS Sierra 10.12 is full of fresh and convenience. Meanwhile, people also have a question haunting around their minds: is it available for us to convert videos on macOS Sierra the same as the former OS X? In fact, many users find that legacy video converter couldn't be port easily to this new platform. Based on this reason, we will pick up the best Video Converter for macOS Sierra for you. Read on to get it.

At first blush, there are a number of different video converting software options for Mac users. Don't know which one to choose? Well, to choose the best macOS Sierra video converter, what need to be taken into consideration is the output format range, program stability, converting speed, output quality, user customization, and user friendly level. Overall, Brorsoft Video Converter for Mac can help you achieve the goal effortlessly, which always keeps consistent update to make video conversion available on the latest operating system.

Overall, this software exceeds all the others in terms of performance, compatibility, and features. The excellent video converter for macOS Sierra 10.12 is able to convert more than 70 popular video formats AVIMKVWMV, MPG, FLV, VOB, TiVo, MTS, MXF, etc to macOS Sierra supported MOV or any other formats including professional encoders- Apple Intermediate Codec, ProRes and DNxHD, DVCPRO, HDV, MPEG-2 you want with both rather fast speed and original quality.

Besides, converting a video into a gadget-friendly version can be done easily as well, as there are pre-sets for the iPhone, iPad, iPod, Galaxy Tab, PS3, Apple TV, Kindle Fire HD and more media devices. The most important feature we'd like to stress again is that this software comes with constantly updated, so that it gives you the strong compatibility for macOS Sierra.

Download the best Video Converter for macOS Sierra:

 (Note: Click here for OS X 10.5)

thanksgiving-sale.jpg

(Brorsoft Thanksgiving Promotion 2016 - Video/MXF/MTS Converter $10 off)


Using the best Video Converter for macOS Sierra to Convert Videos with Best Quality

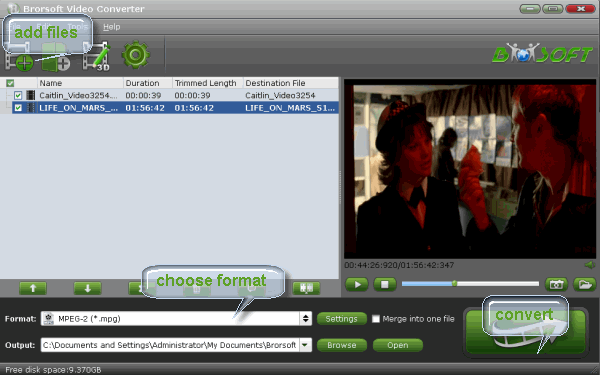
1. Import the video files

Import source video to the best Video Converter for macOS Sierra by directly drag and drop. Alternatively, you can click Add button to load the video files want to convert. On the right windows, you can preview your files and take snapshots of your favorite movie scenes.


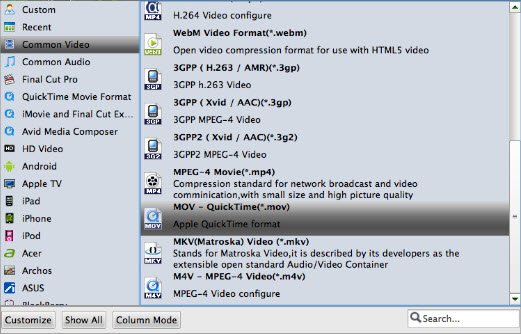
2. Set output format

Click Format bar and select "MOV" or "MP4" from the "Common Video", which are fully compatible with Mac OS X. QuickTime Movie Format format is also an optimal choice.


P.S. This Video Converter for macOS Sierra also helps you to convert videos to mobile devices supported formats, such as iPhone, iPad, iPod, Samsung Galaxy, etc.

3. Start video conversion on macOS Sierra

Click "Convert" button to start converting kinds of video files to your target format. When the conversion is over, click "open" to locate the converted video files for playing, editing, sharing under macOS Sierra.

More features of the macOS Sierra Video Converter:

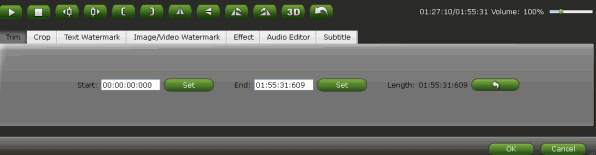
1. Edit Video Files> Open the video editing panel by clicking the "Edit" button and there you will be provided with many video editing features. For example, go to the "Trim" tab and drag the sliders to define the beginning and end time of the video file to cut it.

2. Video/Audio Settings> If you like, you can click "Settings" to change the video encoder, resolution, frame rate, etc. as you wish. Keep in mind the file size and video quality is based more on bitrate than resolution which means bitrate higher results in big file size, and lower visible quality loss, and vice versa.

P.S. Your macOS Sierra works slow? Here are some tricks to speed up macOS Sierra.

Related Guides:
Best H.265 Encoder and Decoders
Apple ProRes Converter Windows
Top 5 Free Video Converter for Mac
Top 5 Free Video Converter Wins
Best XAVC/XAVC S Converter

Monday, November 21, 2016

2016 Thanksgiving Deals- Brorsoft Video Converter $10 off

On Thanskgiving Day, Brorsoft Studio offer 20% discount off for its top-selling video converting tool- Brorsoft Video Converter. Get the $10 coupon code now! 


Thanksgiving is coming. On the special holiday, Brorsoft Studio presents thanks to our customers. Besides, Brorsoft Studio also prepared a big gift for all of you – Thanksgiving Promotion to celebrate the great day. Focusing on product quality and customer needs, Brorsoft offers up to $10 off Coupon code for hot products- Brorsoft Video Converter(Windows/Mac) to reward our customers.

Overall, Brorsoft Video Converter allows you not only to convert a wide range of UHD 4K, HD and SD videos regardless of formats, but also lets you convert those downloaded or homemade videos to any popular video and audio formats for play and share anywhere you like. It supports more than 70 input formats and up to 250+ output file format. Supported output video and audio formats include H.265, MP4, MOV, WMV, AVI, XAVC, XAVC S, MPEG, VOB, TiVo recordings, MXF, MTS/M2TS, FLV, 3GP, 3G2, DivX, XviD, MP3, WMA, WAV, AAC, AC3, M4A and more.

It supports 150+ presets for popular devices like the iPhone (including iPhone 7, iPhone 7 Plus, iPhhone 6 Plus and iPhone 6), iPad, Android devices, Windows-based tablets and game console like PS4Xbox One, etc. This video to devices converter will change video to the correct sizes and formats for your devices and other media players. With it, you can watch any media files on your mobile devices on the go.


Original Price: $45.95

Now: $35.95
store-little-buy-win.png


Original Price: $45.95

Now: $35.95

store-little-byu-mac.png

If you have any question, please feel free to contact us for online support.

Wednesday, November 16, 2016

How to Work XAVC from Sony PXW-X70 in Adobe Premiere Pro

There are a few issues when it comes to editing Sony PXW X70 XAVC files in Adobe Premiere Pro or other NLEs. The article offers some tips and tricks for importing Sony PXW X70 XAVC videos in Premiere Pro CC/CS6/CS5 flawlessly. 


Sony's PXW-X70 records HD video using the XAVC Long-GOP codec with 4:2:2, 10-bit color sampling at 50 Mb/second, providing footage with a high data rate that is suitable for broadcast applications. After recording, most users plan to import Sony PXW-X70 XAVC into Premiere Pro for editing. Stuck in the issue? Don't worry. This article will teach you how to edit Sony PXW X70 XAVC files in Adobe Premiere Pro CC/CS6/CS5 freely.

As some guys recommend online, in order to load Sony X70 XAVC flies into Premiere Pro for smooth editing, it would be better update Premiere program to the latest version. I’ve tried the trial version of Premiere Pro CC, same result- can’t get XAVC viewed in timeline. Alternatively, another solution is to get third-party software like Brorsoft Video Converter for Mac to convert XAVC to Premiere Pro natively supported format like MPEG-2. It will save all the issues.

Overall, the program is the best XAVC converter under Mac OS X(Sierra, El Capitan, Yosemite, Mavericks included). With it, you can effortlessly transcode XAVC to MPEG-2 or MOV, which will create a Premiere Pro friendly file format keeping the original quality. Besides Premiere, this software can also export DNxHD for Avid, ProRes for FCP, AIC for iMovie/FCE and more NLE systems for native editing. For Windows users, you can turn to Video Converter. Just get the right version according to your computer's OS and follow the step-by-step guide below to convert Sony PXW X70 XAVC videos to Adobe Premiere Pro easily.

How to convert Sony PX70 XAVC to MPEG-2 for Premiere Pro CS4/CS5/CS6/CC

Step 1: Load source XAVC files

Launch the XAVC Converter on your Mac, and you can either click “Add” button to import xavc files, or directly drag and drop the files into this program.


Step 2: Select output format

To import XAVC files to Adobe PP, you can follow Adobe Premiere/Sony Vegas column and select MPEG-2 (*.mpg) as output format.


Tip: If the default settings do not fit you requirement, you can click “Settings” icon to and enter “Profile Settings” panel to adjust video size, bit rate, frame rate, sample rate and audio channels.

Step 3: Start XAVC conversion

Finally, press the convert button; it will start to transcode Sony PXW-X70 XAVC files to MPEG-2 for Adobe Premiere Pro CC, CS6 as well as CC, CS5, CS4 immediately. When the conversion is finished, you can click “Open” button to get the resulted videos.

Additional Tips:

This powerful XAVC to Adobe Premiere Converter not only can help you convert XAVC to Premiere, but also enables anyone with XAVC or XAVC S files to use in any non-linear editor like After Effects, Final Cut Pro, iMovie, FCE, Avid Media Composer, etc as long as transcode XAVC to a recognizable format.

Related Guides:
HGet Avid Media Composer Read and Accept XAVC S from Sony A7S II
How to Convert 4K XAVC to MOV for Mac
Importing Sony PXW-FS7 XAVC Intra to Adobe Premiere Pro
Solve Sony FS5 4K XAVC-L codec in Adobe Premiere CC Issue
Edit Sony RX10 II XAVC S in PowerDirector
Importing MOV to iMovie on Mac OS X El Capitan, Sierra
Encoding XAVC to ProRes for Final Cut Pro
Editing 4K XAVC to PowerDirector Smoothly
Using Sony a6500 XAVC S in Avid Media Composer

Friday, November 11, 2016

How to Upload AVI to YouTube Easily

This tutorial offers a simple way to help you upload and share AVI files on YouTube without anhh problem. 


Let's go to the point: if you want to upload AVI file to YouTube, what would be the best way to go about it? Just read on this article. We will share the tips and tricks for uploading and sharing AVI on YouTube in the simplest way.

Searching online, we found many guys are facing the similar troubles "YouTube won't accept AVI files"... In fact, YouTube clearly announce AVI is one of YouTube supported video formats, but AVI is a container format. The video and audio streams stored in different AVI files may be encoded in different ways. YouTube just only recognizes the specific way that the audio and video streams of AVI files are encoded in. So, if your AVI files can't be accepted by YouTube, it may probably be the video & audio codec problem.

To add AVI movies to YouTube without any hassle, a suggestion is to use Brorsoft Video Converter to transcode AVI to YouTube most compatible format like .mov, .mpeg4, .3gp. With this AVI to YouTube video converter, you not only can convert AVI video to FLV, MOV, WMV, MPEG-4, compatible with YouTube, but also can divide your large AVI files into shorter 15 min sections( YouTube has a 15 min limit in usual.) And if you are a Mac user, please get Brorsoft Video Converter for Mac, which helps you convert and upload AVI video to YouTube on Mac OS X(Yosemite, El Capitan, Sierra included).

Guide: How to convert AVI to YouTube format

Step 1. Import AVI files

Lunch the AVI converter; drag & drop .avi files to it. Or click the Add video button to locate the files you want to add. Note that batch conversion is supported so you can add as many files as you like at one time.


Step 2. Select output format

Click Format bar to select an output format. To share your AVI movies on YouTube, .3gp, .flv, .mov format from Common Video are all the proper formats. You can also press the Settings button to adjust the video size, bitrate, frame rate, audio sample rate, etc to optimize the quality.


Step 3. Edit AVI for YouTube(optional)

Click Edit button and you can trim, crop or adjust the video with the built-in video editor to get the very part and effect of the movie you want. And if the video clips you've trimmed are still longer than 15 minutes, you can choose to split the AVI video into smaller parts so as to share on YouTube without limit.


Step 4. Start the conversion

Click "Convert" button to start converting AVI video for uploading to YouTube.

After the conversion, click "Open" button to get the exported files and then upload the converted AVI files into YouTube for sharing with your friends, families, and fans.

Related Guides:
Could I upload an MKV file on YouTube?
How to Deinterlace Video for Vimeo, YouTube
OBS files won’t upload on YouTube- A quick fix
Any way to upload and share 4K video on YouTube
Convert and Upload H.265/HEVC Videos to YouTube
Basic Steps to Upload Gopro Hero5 4k Video to Youtube
Upload XAVC S to Youtube with Best Settings